FireSnareVerb Manual
The core functions
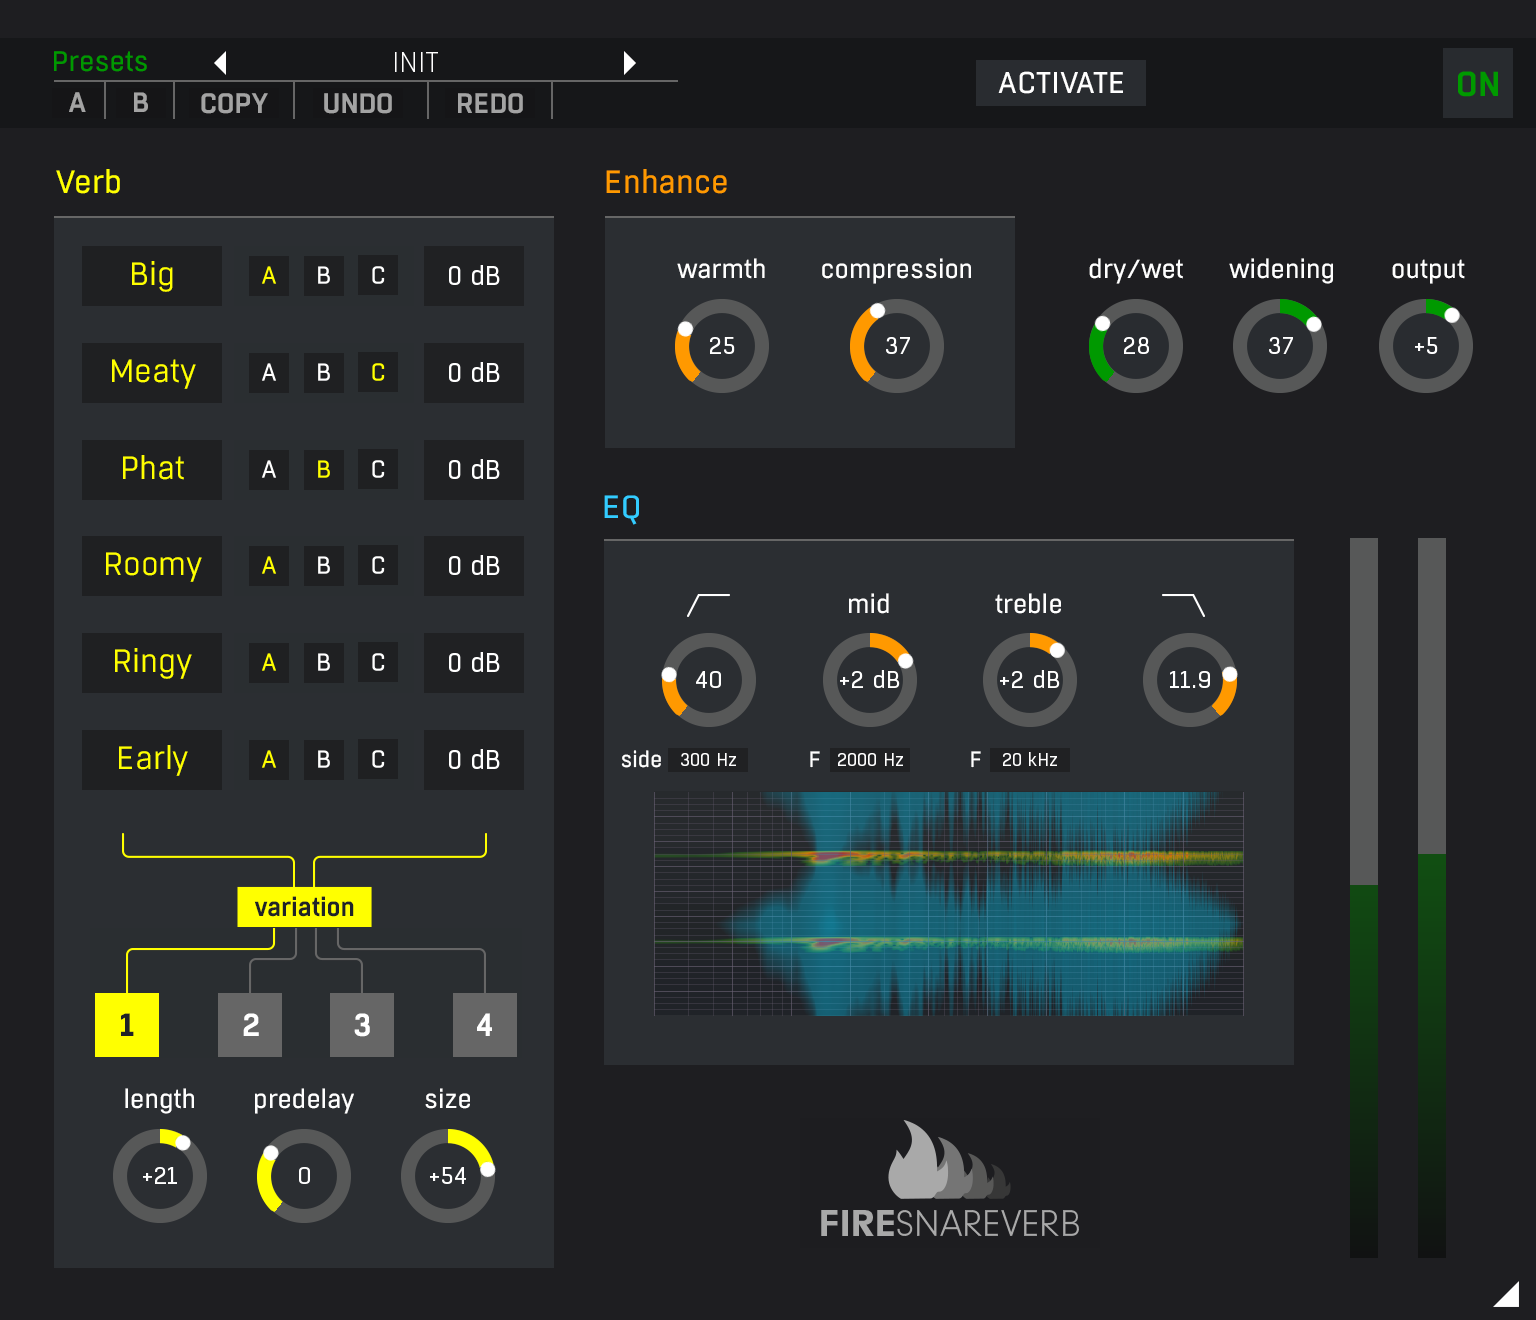
The algorithm is the core of the plugin. It lets you access 18 distinct algorithms that the plugin implements. These have been grouped into 6 categories, 3 algorithms in each, which sound kind of similar. You can enable & disable each category and choose one of its A/B/C types. You can also control the volume of each.
"Big" algorithms produce big, long, but highly controlled tails and are especially useful for heavier music genres. These make the body of the snare longer, like in a large studio, but disappear quickly, so they don't clutter the mix and really just make the snare sound bigger. On its own these algorithms sound horrible, but when mixed with the original snare, these are amazing. With these, you can almost avoid reasonably sounding rooms and room mics, which would otherwise be essential for any heavier production.
"Meaty" algorithms are made with similar points in mind, but these have much more natural decay, so they are useful for all genres that require powerful snare drums, but they perhaps don't need them too long and prominent. It can however serve very well as a supplement to the Big algorithms to make snare drum even bigger.
"Phat" algorithms are especially useful if the snare drum doesn't have good transient information (or it hasn't been recorded well). It makes the initial attack much stronger, without making the snare drum overly big.
"Roomy" algorithms produce some additional room-kind of ambience, which is more natural, so it is especially suitable for lighter genres.
"Ringy" algorithms sound intentionally ringy and hideous and can be used to make the snare drum cut through the mix. These are especially useful for punk and similar "garage" genres, and in cases the snare drum has been "overtreated" with muffling.
"Early" algorithms do not produce any ambience per se. They only produce short bursts of early reflections, which make the snare drum sound more prominent and stereophonic. These are good for any genres to just give the snare drum a little spark without introducing ambience.
Variation lets you choose from 4 predefined "sounds" of each algorithm. Simply put, if you feel like the default variation 1 doesn't sound good with your snare no matter which A/B/C algorithms you use, or it sounds good, but somehow doesn't work well in the context of the mix, try a different variation. The differences are subtle, but they can save your production in dense mixes.
Length controls the length of the reverb tail. In many cases, it literally makes the snare bigger or smaller.
Predelay lets you delay the reverb delay from the direct snare sound. Small values merely change the character and let you avoid phase cancellations, which are rare, but can happen. Larger values often move the snare sound to a bigger space and make it feel further and at some point the 2 sounds separate altogether, which gets you to a more creative territory.
Size is kind of similar to Length, but it changes the apparent size of the virtual room. But since most of these reverbs actually don't produce an actual room or ambience, the size more like changes the length and character of the reverb.
Enhancer
Warmth lets you saturate the tail a bit, to make it richer with harmonics and overall more powerful.
Compression lets you compress the tail, which leads to a more unnatural decay of the reverb, which fills the space even more and makes the snare tail sound even bigger and more powerful. Be aware that while this usually sounds extremely fulfilling as a one-click goodizer, it can be prone to "overusing".
EQ
A low-cut filter lets you remove low frequencies from the reverb. By the time the signal reaches the reverb, you should have already filtered out the low-frequency rumble, but the reverb sometimes needs more. Keeping the low frequencies usually sounds good while listening to the snare drum itself, but in the context of the mix, it lets the snare sound muddy and cluttered, so this feature lets you clean it up a bit.
A low-cut side filter is similar to the low-cut filter, but it only affects the side signal, leaving the center intact. In many cases, you want to keep the low frequencies and the thump of the snare, but the snare drum is usually dominating the center, and the reverb can make it significantly wider. That may sound good at first, but it usually collides with the guitars also being stereo. Low-cut side lets you keep the low frequencies of the snare, but also keeps the stereo image properly centered.
Mid amplifies or attenuates middle frequencies. That often helps you improve the presence of the snare drum. Or attenuate it, if it is too prominent.
Mid F controls the frequency of the Mid filter.
Treble controls the air, the highest frequencies, of the snare reverb.
Treble F controls the frequency of the Treble filter.
A high-cut filter lets you remove the highest frequencies from the snare reverb. You can use it if the snare produces some ugly resonances, or if you want to keep the air for some other element of the mix.
Output
Dry/Wet controls the mix between the processed and unprocessed signals. When used on a separate bus, only the default 100% probably makes sense, but if you decide to use this as an insert effect on the snare bus directly, you would need to significantly lower the value.
Widening lets you change the width of the reverb. Use it to control the position in the mix. If there are many highly stereophonic elements in the mix and the snare is "disappearing" in them, try lowering the width, even if it makes the snare itself sound weaker on its own. And vice versa.
Output controls the output gain of the plugin.
Toolbar
FirePreamp features several standard controls, which can improve your workflow.
A, B, and Copy buttons - The plugin remembers two sets of settings, A and B. Clicking any of these two buttons switches between these two settings. The selected one is highlighted in red. This is a great way for A/B checking and selecting the best settings. The "Copy" button copies the current settings to the other slot (if A is currently selected, the button will copy the current settings to slot B).
Presets and right and left arrows - The plugin comes with a set of presets, which should do the trick for most cases. Access them using the right and left arrows or by clicking the preset field directly. There, you can save and manage your own presets as well. On your computer, presets are stored in the following paths:
Windows:
C:\Users\username\Documents\FireSonic\FirePreamp
Mac OS X:
HOME/Documents/FireSonic/FireSpacer
Undo and Redo buttons - All of us make mistakes from time to time, which is when these two buttons come in handy. The undo button reverts your last change, and the redo puts it back.
Bypass button - It is always a good idea to check if the plugin actually improves your sound, which is what the bypass button is for. In many DAWs, it will be in sync with the DAW's bypass button (if it has one).
Right-Click menu
Right-click anywhere in the plugin background with the right mouse button, and you will get access to the following features.
Scale the GUI precisely by percentage.
Get the version info.
Access the product web page, reach support, and access online documentation.
Contact support
Open the presets folder (to add, arrange, or delete presets manually)
Activate/Deactivate the plugin
Access Licence Manager (to activate or deactivate the plugin or several plugins at the same time)
Disable/Enable GPU Acceleration.
Disable/Enable Intelligent sleep on silence function that disables the plugin when no sound is on the input or output to save CPU power.
Right-click any control (knob, button) to access help for the particular parameter.
Double-click Menu
Some parameters let you access more accurate numeric settings by double-clicking the knobs.
Presets and left-right arrows
The plugin comes with a set of presets, which should do the trick for most cases or give you a good starting point when tweaking your sound. Access them using the right and left arrows, or by clicking the preset field directly. You can save and manage your own presets there as well. In your computer, presets are stored in the following paths:
Windows:
c:\Users\USER NAME\AppData\Roaming\UnitedPlugins\PRESETS\PLUGIN NAME
macOS X:
/Users/username/Library/Application Support/UnitedPlugins/PRESETS/PLUGIN NAME
Installation and maintenance
Use UnitedPluginsManager (Downloads section) to install, uninstall, update, and activate the plugin.
If you find yourself in trouble, please contact us via support@unitedplugins.com.
Common functions
(Available in most plugins)
Activate button - Opens a browser to locate the licence file to unlock the full version. (This can easily be handled by UnitedPlugins Manager right after installation)
Toolbar
FireSnareVerb features several standard controls, which can improve your workflow.
A, B and Copy buttons - The plugin remembers two sets of settings, A and B. Clicking any of these two buttons switches between these two settings. The selected one is highlighted in red. This is a great way for A/B checking and selecting the best settings. The "Copy" button copies the current settings to the other slot (if A is currently selected, the button will copy the current settings to slot B).
Presets and right and left arrows - The plugin comes with a set of presets, which should do the trick for most cases. Access them using the right and left arrows or by clicking the preset field directly. There, you can save and manage your own presets as well.
Undo/Redo - Will revert back one step to help avoid the accidental change of parameter values.
Background Right-Click Menu
Right-click anywhere in the plugin background with the right mouse button, and you will get access to the following features.
Scale the GUI precisely by percentage.
Get the version info.
Access the product web page, reach support and the online documentation.
Contact support
Open the presets folder (to add, arrange or delete presets manually)
Activate/Deactivate the plugin
Access Licence Manager (to activate or deactivate the plugin or several plugins at the same time)
Disable/Enable GPU Acceleration.
Disable/Enable Intelligent sleep on silence function that disables the plugin when no sound is on input or output to save the CPU power.
Parameter Right-Click Menu
Right-click any parameter to call up a menu that gives you access to:
The parameter description
Parameter reset
Double-click Menu
Some parameters let you access more accurate numeric settings by double-clicking the knobs.
Presets and left-right arrows
The plugin comes with a set of presets, which should do the trick for most cases or give you a good starting point when tweaking your sound. Access them using the right and left arrows, or by clicking the preset field directly. You can save and manage your own presets there as well. In your computer, presets are stored in the following paths:
Windows:
c:\Users\USER NAME\AppData\Roaming\UnitedPlugins\PRESETS\FireSnareVerb
macOS X:
/Users/username/Library/Application Support/UnitedPlugins/PRESETS/FireSnareVerb
(Right-Click the plugin background to open the preset folder directly)
Installation and maintenance
Use UnitedPluginsManager (Downloads section) to install, uninstall, update, and activate the plugin.
Support
If you find yourself in trouble, please contact us via support@unitedplugins.com.