Phantomix Manual
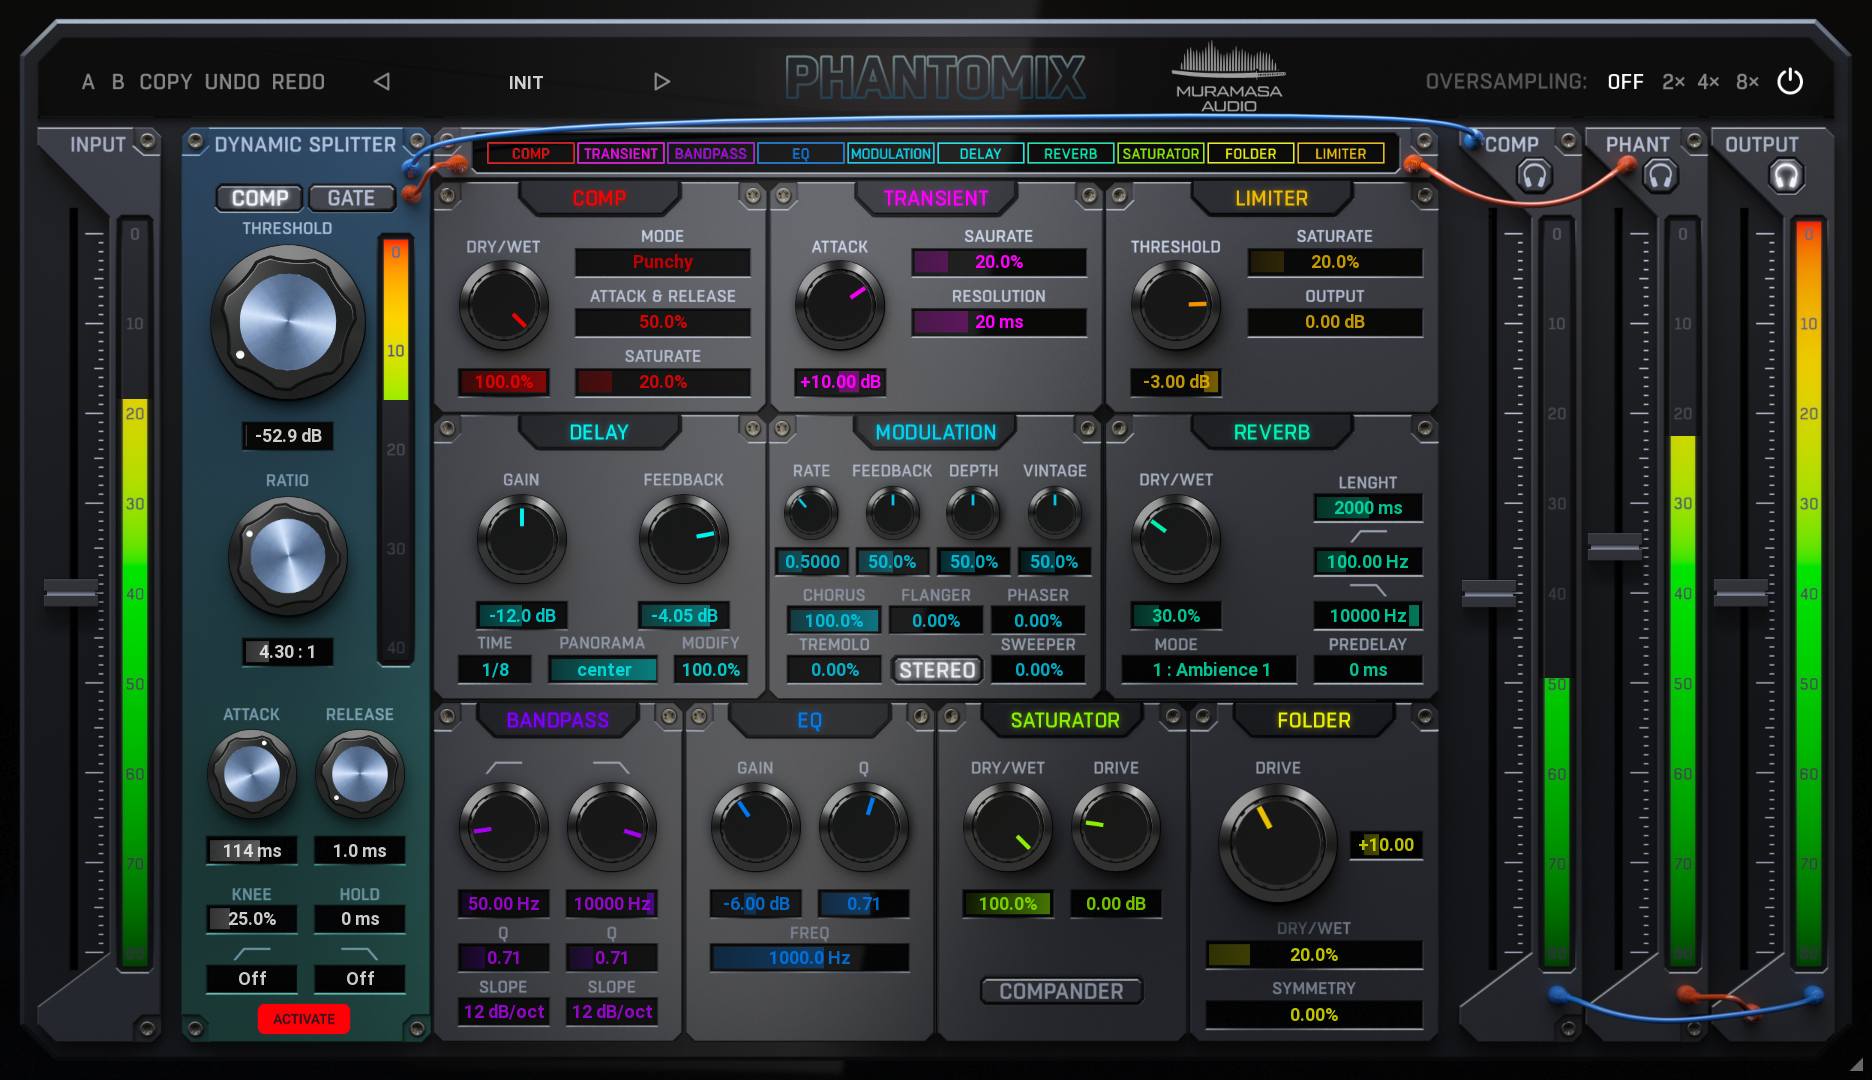
The GUI is structured as a signal chain, going from left to right.
Input meter and input gain fader controls and measures the input level. In order to make things as easy to use as possible, make the input level peak somewhere in the -20dBFS to 0dBFS range.
Dynamic splitter
Dynamic splitter is probably the most important part of the plugin. To make things easy to understand, imagine this is just a simple compressor. The output of the compressor is sent to the output intact, as with any other compressor. The difference is that what a normal compressor "reduces" (or removes), is not discarded by Phantomix, and instead it is sent to the FX section. The dynamic splitter therefore controls the amount of effecting and what part of the signal is effected. The parameters are self explanatory, if you are proficient with compressors & gates. If there are no effects enabled and you don't change the Comp & Phantom gains, the plugin will have no effect on the signal, since however the signal was split, it will be mixed together again.
Comp/Gate switch controls the mode the splitter operates in. In the default Comp mode, the loud part of the input gets effected. In the Gate mode, the silent part gets effected.
Threshold controls the minimal level above which the compression starts to happen (or maximal level below with which the gating occurs). By level, we do not mean the peak level, but the level follower output controlled by the Attack & Release parameters. Similarly to normal compressors, the lower the Threshold is, the more processing you get - in context of Phantomix, the lower the Threshold, the bigger amount of the signal gets processed through the FX. Therefore, a good way to use this is to move the Threshold to the top and then slowly lower it until the desired amount of signal is effected.
In Gate mode, it is the other way around - everything below the Threshold is effected, so you should lower the Threshold to the minimum and gradually increase it until the desired amount of signal is effected.
Ratio complements the Threshold by controlling how quickly the signal gets effected more above the Threshold (below for gate) as the level increases (decreases for gate). You could say lower ratio smoothens the transition between effected and dry.
Attack controls how quickly the level detector increases the level while following the input peak level. By increasing Attack, you can delay when the signal reaches threshold and starts getting effected. For example, when processing drums and you want to keep the initial transient uneffected in Comp mode, increase the Attack time.
Release controls how quickly the level detector lowers the level while following the input peak level. By increasing Release you can keep the level above Threshold longer. For example, when processing drums, lowering the Release time will make the hits effected, but not the sustains. Increasing the Release time will make the sustains effected too.
Knee kind of complements the Ratio by further smoothing the transition between effected and uneffected.
Hold complements the Release by holding the level at the maximum for a certain amount of time. It is useful with percussive sounds - by increasing Hold instead of Release you can make a certain time effected without effecting too long section of the sustain.
Hipass/Lopass filters determine which part of the frequency spectrum will be affected by the dynamic splitter.
Lock protects the Dynamic splitter setting from being changed when you load a preset.
Order
The Effect order view above the main module section controls the order of the effects in the FX section. Drag an effect to change the order. Double-click on one to enable/disable it.
Comp
The Comp module is an advanced analogue compressor simulation. It implements 5 different analogue compressor simulations. Compressing a phantom signal from a compressor may seem odd, but there are some interesting practical applications. In Comp mode, you can use the splitter to control which signals actually get compressed. For instance, a drum often has snare & kick being louder than the rest and also requires more processing, especially compression. Using just the compressor's Threshold to make sure only these 2 drums get processed is tricky and impractical. Phantomix lets you use the splitter to extract only the relevant signals to be compressed and then use the compressor to do the processing, which is often very hard.
Gate is kind of the opposite - imagine the snare and kick are too loud and you want to keep them intact, but increase the level of everything below. Super easy task with Phantomix.
Dry/wet controls the amount of compression.
Mode lets you choose from 5 different analog compressor flavours - Clean, Punchy, Spiky, Brutal and Squashy. Choose the one with the character you like the most.
Attack & Release controls the speed of the compressor. We decided to keep it as a single control with the most typical balance between the two.
Saturate controls analog-style saturation effect to bring some additional warmth typical for analog compressors.
Transient
Transient module is an attack shaping module, which lets you amplify or attenuate the initial transient for percussive elements of the sound, typically drums. Phantomix lets you easily control which elements you want to process. For instance, if the snare and kick are louder than the rest, but still miss the initial spike to cut through the mix, you can just use the Transient module (in Comp mode) to get the spike without changing the other elements of the drums (e.g. hihat). Conversely, if the other elements are buried too much below the kick and snare, you can use the Gate mode to let them cut through more.
Attack controls the desired gain for the initial transient. Values above 0% amplify the transients, values below 0% attenuate it.
Saturate controls the analog-style saturation applied on the transient signal to give it some additional warmth and harmonics to cut through the mix without using too much headroom.
Resolution controls the detector timing - sort of the length of the transients.
Limiter
The limiter module is a simple but efficient limiter that can be used to increase the loudness of the phantom signal or to limit its level.
Threshold controls the limiter threshold, which is then compensated for by increasing the loudness. So lowering the threshold increases loudness.
Saturate controls analogue-style saturation effect to bring some additional warmth typical of analogue limiters.
Output defines the output gain. Useful especially if you used the limiter to squash the sound, but don't want to actually change the loudness.
Delay
The delay module implements a classic ping-pong delay. The advantage is again in the ability to control what gets fed into the delay. By creating echoes of only the loud (Comp mode) or silent (Gate mode) parts of the signal, you can produce a reasonable but controlled amount of echoes to fill the empty spaces without crowding them too much.
Gain controls the level of the echoes the delay produces. You can think of it as "Wet" control.
Feedback controls the feedback gain. The higher it is, the longer you will hear the echoes. With 0 dB, you get infinite echoes.
Time controls the delay time. It is specified as musical units (1/4 notes, etc.), as that is most useful in most modern production.
Panorama controls the panorama for the first echo (then inverted for each further echo), which is how you turn a normal delay (Panorama in the center) into a ping-pong delay (Panorama anywhere else).
Modify lets you alter the time slightly. It is useful to make the delay "less accurate" and more natural. If you, for example, process a drum loop, where the snare is always in the 2nd and 4th quarters, if the Modify wasn't used, the delay could align the snare echoes, for example, with the normal snares, which could sound way too digital and in a way only increase the level of that snare. Modifying the delay time a little will place the echoes slightly ahead or behind producing much nicer sound without unwanted amplifications.
Modulation
The modulation module implements multiple modulation effects - Chorus, Flanger, Phaser, Tremolo and Sweeper (kind of a filter). These are connected in series, and you can control the amount of each of them.
Rate controls the speed of change of the effect. Most of the effects are driven by a single LFO with this exact speed.
Feedback controls the internal feedback. It has no effect on Tremolo.
Depth serves as a global amount for all of the effects.
Vintage defines the amount of internal saturation providing classic analog warming.
Chorus controls the amount of Chorus processing.
Flanger controls the amount of Flanger processing.
Phaser controls the amount of Phaser processing.
Tremolo controls the amount of Tremolo processing.
Sweeper controls the amount of Sweeper processing.
Stereo switch makes the effects stereophonic - process each channel differently, hence potentially making a monophonic input stereophonic.
Reverb
The reverb module provides a very advanced, pristine-sounding reverb. It lets you provide ambience and fill space in the sound without actually cluttering it. Using it in Comp mode will get you ambience for the loud sounds (e.g. snare), but won't clutter the mix. Using it in Gate mode will fill the spaces without causing the loud sounds in the ambient.
Dry/Wet controls the Ratio between the dry and wet signals, in other words, how much reverb you get.
Mode lets you select from nearly 30 different algorithmic reverbs, sorted from small to large spaces and then, creative ones.
Length defines the length of the reverb tail. Note that this one depends on the Mode.
Low-cut lets you remove low frequencies from the reverberation signal. It is generally handy to do that to clean the mix.
High-cut lets you remove high frequencies from the reverberation signal. High frequencies make sounds appear close and in-your-face, so this, in effect, makes things appear further away.
Predelay delays the reverberation signal from the dry signal, which simulates the space between the sound source and the listener. The longer the predelay is, the further away the source seems. At some point (around say 100 ms), the brain stops understanding that the reverberation belongs to the dry signal and starts interpreting them separately, and then the dry signal becomes close to the listener again. Predelay can therefore be used to control the distance from the source to the destination, but detaching the 2 signals can also be useful, for instance, to fill up a mix that isn't full enough without smearing the signal with the reverb itself.
Bandpass
The bandpass module provides low-cut and high-cut filters. In Comp mode, you can remove these frequencies to make the loud sounds appear smaller and further away, so they blend with the mix better. Drums often carry a lot of low end, and you may not want to remove the low frequencies entirely, just clean them in loud signals. In Gate mode, you can use it to make the sound spacier by removing the most attenuated frequencies from the less loud and "unimportant" signals. The bandpass module can be used creatively as well, of course.
Low-cut frequency controls the frequency limit below which the frequencies are gradually removed.
Q controls the resonance of the filters separately for each filter. For non-creative uses, set it to the default value.
Slope controls the attenuation per octave. The higher the slope, the more unwanted frequencies are removed.
High-cut frequency controls the frequency limit above which the frequencies are gradually removed.
Slope controls the attenuation per octave of the filters separately for each filter. The higher the slope, the more unwanted frequencies are removed.
EQ
EQ module implements a single peak filter designed for surgical precision cuts. For instance, snare drums often produce some ugly ringing. Sometimes it is in the attack stage (which asks for Comp mode), most of the time it is in the sustain stage (which asks for Gate mode). You can just use the EQ module to attenuate the ringing, while keeping the overall character intact.
Gain controls the gain applied on the frequencies around the center frequency controlled by Freq parameter.
Q controls the bandwidth of the filter. The lower it is, the more focused it is onto the small area around the Freq.
Freq controls the center frequency of the filter.
Saturator
Saturator module implements an analog style saturation useful to add warmth to the effected sound. In Comp mode it lets you control the loud signals and blend them with the silent signals. In Gate mode it lets you amplify and warm the silent sounds, so they blend better with the loud ones.
Dry/Wet controls how much saturation you want to get.
Drive controls the input gain, which in effect causes more signal to get saturated.
Compander switch activates the dynamic unit, which makes the saturation amount similar for both loud and silent signals. With it enabled, you will likely feel like the signal is saturated much more and constantly, while without this enabled only louder sounds are actually saturated.
Folder
Folder module implements a wavefolder-style distortion useful similarly to Saturator, but it's much more drastic.
Drive controls the input gain, which in effect produces more distortion.
Dry/Wet controls the ratio between dry and distorted signals, hence how much distortion you want to get.
Symmetry controls the character of the distortion.
Audition Modes
Comp audition switch lets you listen to the compressed/gated signal. This is what you would get if the phantom signal weren't affected and mixed back.
Comp volume lets you control the amount of compressed signal in the final mix.
Phant audition switch lets you listen to the effected phantom signal. Use it to set the splitter parameters and audition what the effects did to the phantom signal.
Phant volume lets you control the amount of effected phantom signal in the final mix.
Output audition switch is selected by default and produces the normal Phantomix output with both the compressed and phantom signals present.
Output volume controls the output gain adjustment.
Toolbar
A+B buttons - The plugin remembers 2 sets of settings, A and B. Clicking any of these 2 buttons switches between these 2 settings. The selected one is highlighted in red. This is a great way for A/B check and select the best settings.
Undo+Redo - Will revert back one step to help avoid the accidental change of parameter values.
Right-Click
Right-click anywhere in the plugin background with the right mouse button and you will get access to the following features.
Scale the GUI precisely by percentage.
Get the version info.
Access the product web page, reach support and access online documentation.
Contact support
Open the presets folder (to add, arrange or delete presets manually)
Activate/Deactivate the plugin
Access Licence Manager (to activate or deactivate the plugin or several plugins at the same time)
Disable/Enable GPU Acceleration.
Disable/Enable Intellingent sleep on silence function that disables the plugin when no sound is on input or output to save the CPU power.
Right-click any control (knob, button) to access help for the particular parameter.
? - Help - Loads the help document, you are reading it now :)
Double-click Menu
Some parameters let you access more accurate numeric settings by double-clicking the knobs.
Presets and left-right arrows
The plugin comes with a set of presets, which should do the trick for most cases or give you a good starting point when tweaking your sound. Access them using the right and left arrows, or by clicking the preset field directly. You can save and manage your own presets there as well. In your computer, presets are stored in the following paths:
Windows:
c:\Users\USER NAME\AppData\Roaming\UnitedPlugins\PRESETS\PLUGIN NAME
macOS X:
/Users/username/Library/Application Support/UnitedPlugins/PRESETS/PLUGIN NAME
Installation and maintenance
Use UnitedPluginsManager (Downloads section) to install, uninstall, update and activate the plugin.
If you find yourself in trouble, please contact us via support@unitedplugins.com.
Common functions
(Available in most plugins)
Activate button - Opens a browser to locate the licence file to unlock the full version. (This can easily be handled by UnitedPlugins Manager right after installation)
Toolbar
Phantomix features several standard controls, which can improve your workflow.
A, B and Copy buttons - The plugin remembers two sets of settings, A and B. Clicking any of these two buttons switches between these two settings. The selected one is highlighted in red. This is a great way for A/B checking and selecting the best settings. The "Copy" button copies the current settings to the other slot (if A is currently selected, the button will copy the current settings to slot B).
Presets and right and left arrows - The plugin comes with a set of presets, which should do the trick for most cases. Access them using the right and left arrows or by clicking the preset field directly. There, you can save and manage your own presets as well.
Undo/Redo - Will revert back one step to help avoid the accidental change of parameter values.
Background Right-Click Menu
Right-click anywhere in the plugin background with the right mouse button, and you will get access to the following features.
Scale the GUI precisely by percentage.
Get the version info.
Access the product web page, reach support and the online documentation.
Contact support
Open the presets folder (to add, arrange or delete presets manually)
Activate/Deactivate the plugin
Access Licence Manager (to activate or deactivate the plugin or several plugins at the same time)
Disable/Enable GPU Acceleration.
Disable/Enable Intelligent sleep on silence function that disables the plugin when no sound is on input or output to save the CPU power.
Parameter Right-Click Menu
Right-click any parameter to call up a menu that gives you access to:
The parameter description
Parameter reset
Double-click Menu
Some parameters let you access more accurate numeric settings by double-clicking the knobs.
Presets and left-right arrows
The plugin comes with a set of presets, which should do the trick for most cases or give you a good starting point when tweaking your sound. Access them using the right and left arrows, or by clicking the preset field directly. You can save and manage your own presets there as well. In your computer, presets are stored in the following paths:
Windows:
c:\Users\USER NAME\AppData\Roaming\UnitedPlugins\PRESETS\Phantomix
macOS X:
/Users/username/Library/Application Support/UnitedPlugins/PRESETS/Phantomix
(Right-Click the plugin background to open the preset folder directly)
Installation and maintenance
Use UnitedPluginsManager (Downloads section) to install, uninstall, update, and activate the plugin.
Support
If you find yourself in trouble, please contact us via support@unitedplugins.com.