QuickVox Manual
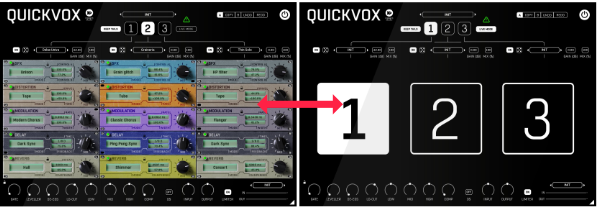
123 - Switches between the 3 racks. This can be used live to change between different parts of a song, for example.
MIDI - To make the controls even easier, you can use a MIDI controller, or connect a MIDI track. The lowest notes (C-2, C#-2 and D-2) select 1, 2 and 3 for you. Please note, some DAWs use different octave numbering system, so you may have to try a bit here ;) .
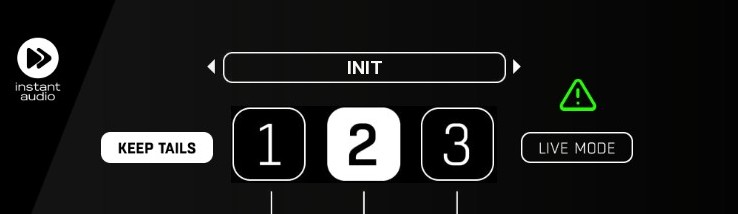
Keep tails - allows the delay and reverb tails to continue to decay when switching between racks. If this is off, switching racks will cut the decay tails and switch to another selected rack's settings.
Live mode: For easier control and more user comfort, QuickVox has two interface modes. When you turn on the Live mode, QuickVox will hide the detailed access to the particular effects, and the 123 switch will take over the plugin window. In that case you can easily hit the "big numbers" of the switch with your mousepad or mouse, without worrying that you could miss the button at the right time.
Panic - this button stops all the plugin processing immediately, suitable when you need to kill feedback or tails at once.
Racks headers
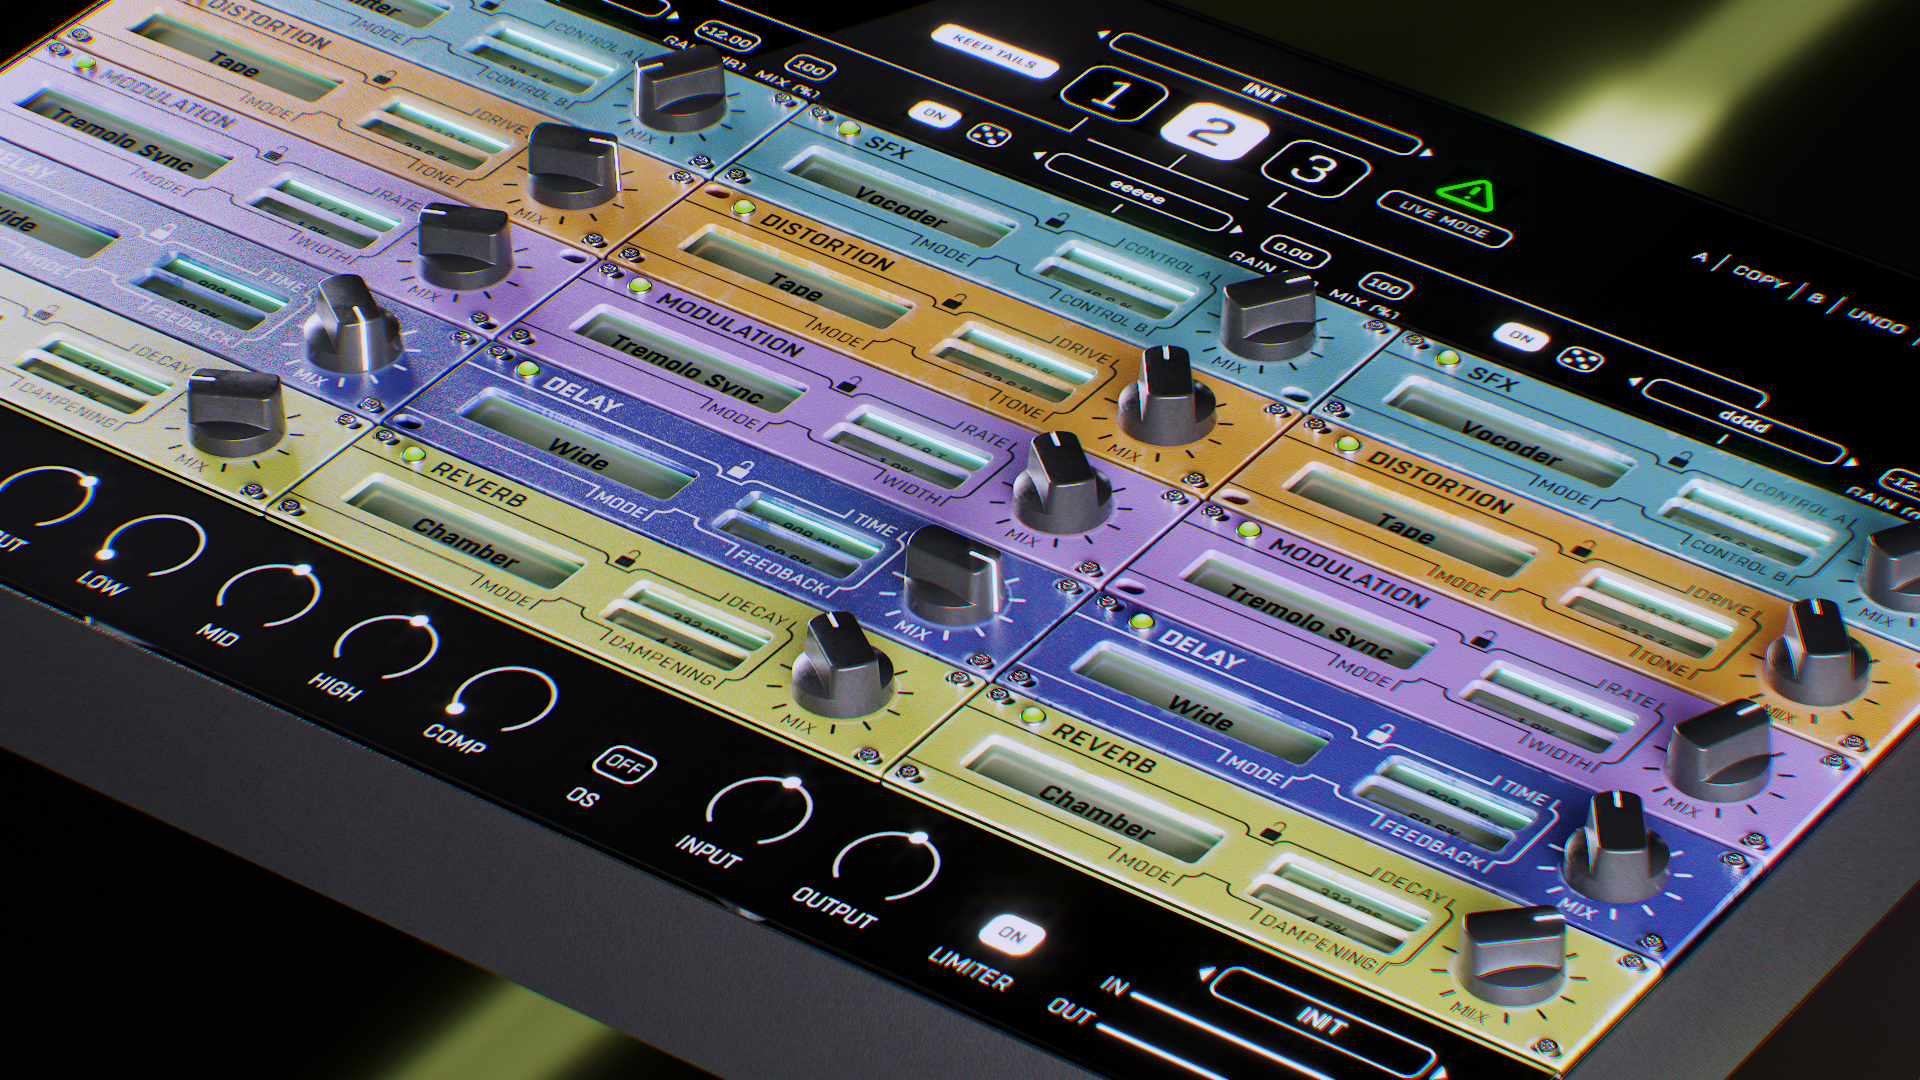
QuickVox features three identical racks with identical effect units.

ON - Each Rack's header contains its own bypass button, so you may check the dry signal vs the effected signal.
Dice - Intelligent randomizer will generate random settings for the FX rack. It will change all parameters in all units of the affected rack.
Gain - Set the gain level for the wet signal by +/-12dB for the particular rack.
Mix - Set the ratio between dry and wet signal for the particular rack.
Rack presets - Each rack has a preset window. Tweak the effects in a rack the way you want, click the presets window, and choose NEW to save a preset. The saved preset can now be loaded to any of the three racks. (The rack presets exclude the mix and gain parameters of the rack,)
Effects
Each effect has a selector for effect mode and two parameters to edit.
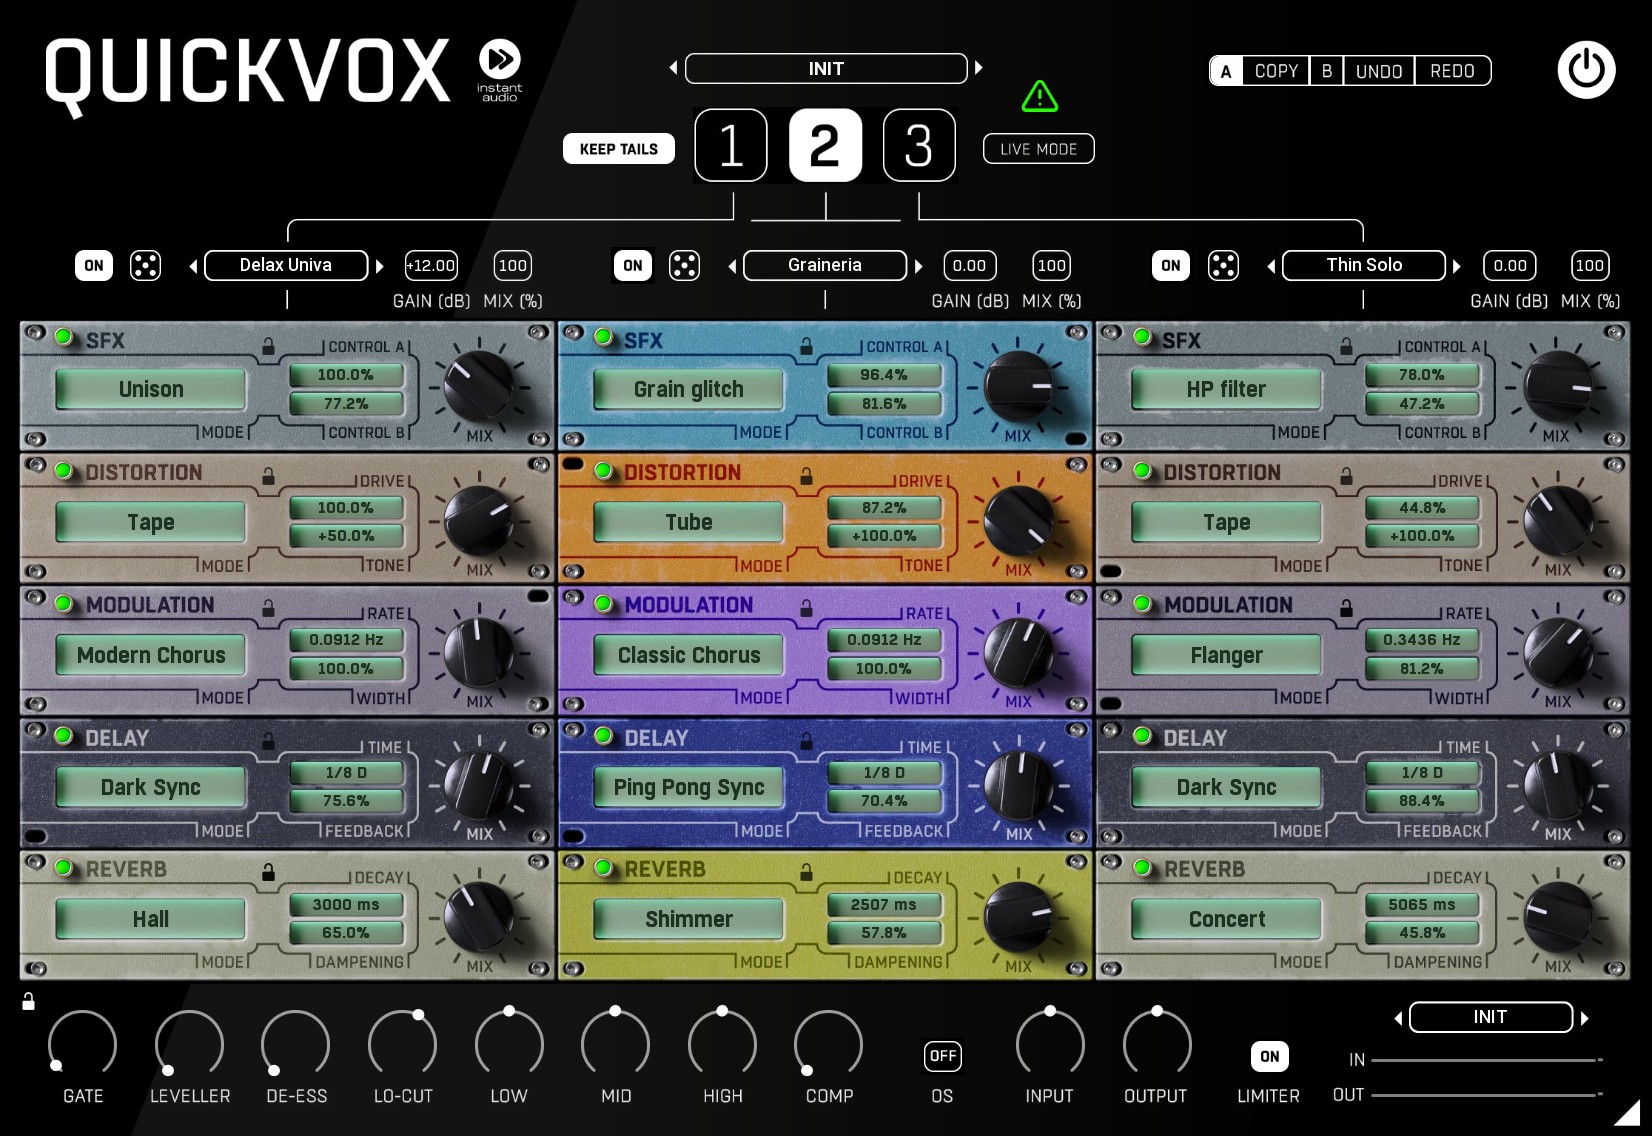
Lock - Lock protects the effect's parameters from being overwritten when you load a preset or use a randomizer.
Bypass - Bypasses the actual module
Mix knob - sets the dry/wet ratio of a particular effect.
SFX
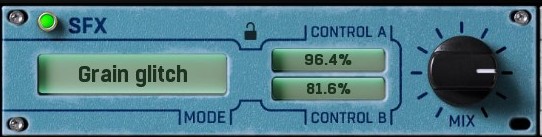
Type - selects the type of effect for the Special effects module. Choose from Unison, Pitch double, Freq shifter, Ring mod, Vocoder, LP filter, HP filter, Comb, Grain glitch, Double track, Autotune
Control A - changes the character of the effect. It will have a different function depending on the selected mode.
Control B - changes the character of the effect. It will have a different function depending on the selected mode.
Distortion
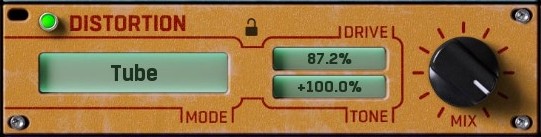
Type - selects the type of effect for the Distortion module. Choose from Tube, Tape, Fold, Crush, Derez, Amp, Clip, Pedal.
Drive - controls the amount of gain driving the distortion.
Tone - controls pre-distortion filtering. Left for low-pass and right for high-pass.
Modulation
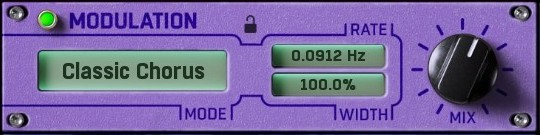
Type - selects the type of effect for the Modulation module. Choose between Classic Chorus, Modern Chorus, Flanger, Flanger Sync, Phaser, Phaser Sync, Tremolo, Tremolo Sync, Vibrato, Vibrato Sync
Rate - controls the speed of the modulation.
Width - controls the left/right offset of the modulation.
Delay
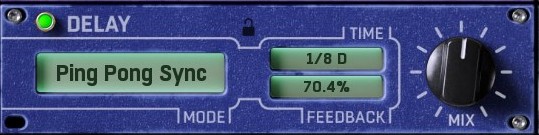
Type - selects the type of effect for the Delay module. Choose between Digital, Digital Sync, Tape, Tape Sync, Ping Pong, Ping Pong Sync, Dual, Dual Sync, Wide, Wide Sync, Dark, Dark Sync, Light, Light Sync
Time - controls the delay length.
Feedback - controls the amount of signal fed back into the input, therefore, the number of delay repeats.
Reverb
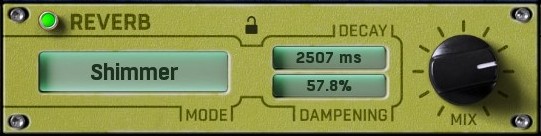
Type - selects the type of effect for the Reverb module. Choose between Room, Studio, Lounge, Hall, Concert, Vintage, Chamber, Cathedral, Stadium, Plate, Spring, Shimmer
Decay - controls the length of the reverb tail.
Dampening - controls the amount of filtering over time.
Mix section

Presets - The small window lets you save and load presets for the Mix section.
Lock - prevents the Mixing section from being altered when you load a preset.
Gate - Controls the threshold for the noise gate.
Leveller - Controls the amount of auto levelling. This helps to keep gains consistent.
DeEss - reduces the volume of S sounds.
LoCut - controls the frequency of the high-pass filter.
Low - controls the gain of low frequencies.
Mid - controls the gain of mid-frequencies.
High - controls the gain of high frequencies.
Compress - controls the amount of dynamic compression.
Input - controls the input gain.
Output - controls the output volume.
OS - determines the oversampling for the plugin (higher oversampling value consumes more CPU)
Right-Click
Right-click anywhere in the plugin background with the right mouse button and you will get access to the following features.
Scale the GUI precisely by percentage.
Get the version info.
Access the product web page, reach support and access online documentation.
Contact support
Open the presets folder (to add, arrange or delete presets manually)
Activate/Deactivate the plugin
Access Licence Manager (to activate or deactivate the plugin or several plugins at the same time)
Disable/Enable GPU Acceleration.
Disable/Enable Intellingent sleep on silence function that disables the plugin when no sound is on input or output to save the CPU power.
Right-click any control (knob, button) to access help for the particular parameter.
? - Help - Loads the help document, you are reading it now :)
Double-click Menu
Some parameters let you access more accurate numeric settings by double-clicking the knobs.
Presets and left-right arrows
The plugin comes with a set of presets, which should do the trick for most cases or give you a good starting point when tweaking your sound. Access them using the right and left arrows, or by clicking the preset field directly. You can save and manage your own presets there as well. In your computer, presets are stored in the following paths:
Windows:
c:\Users\USER NAME\AppData\Roaming\UnitedPlugins\PRESETS\PLUGIN NAME
macOS X:
/Users/username/Library/Application Support/UnitedPlugins/PRESETS/PLUGIN NAME
Installation and maintenance
Use UnitedPluginsManager (Downloads section) to install, uninstall, update and activate the plugin.
If you find yourself in trouble, please contact us via support@unitedplugins.com.
Common functions
(Available in most plugins)
Activate button - Opens a browser to locate the licence file to unlock the full version. (This can easily be handled by UnitedPlugins Manager right after installation)
Toolbar
QuickVox features several standard controls, which can improve your workflow.
A, B and Copy buttons - The plugin remembers two sets of settings, A and B. Clicking any of these two buttons switches between these two settings. The selected one is highlighted in red. This is a great way for A/B checking and selecting the best settings. The "Copy" button copies the current settings to the other slot (if A is currently selected, the button will copy the current settings to slot B).
Presets and right and left arrows - The plugin comes with a set of presets, which should do the trick for most cases. Access them using the right and left arrows or by clicking the preset field directly. There, you can save and manage your own presets as well.
Undo/Redo - Will revert back one step to help avoid the accidental change of parameter values.
Background Right-Click Menu
Right-click anywhere in the plugin background with the right mouse button, and you will get access to the following features.
Scale the GUI precisely by percentage.
Get the version info.
Access the product web page, reach support and the online documentation.
Contact support
Open the presets folder (to add, arrange or delete presets manually)
Activate/Deactivate the plugin
Access Licence Manager (to activate or deactivate the plugin or several plugins at the same time)
Disable/Enable GPU Acceleration.
Disable/Enable Intelligent sleep on silence function that disables the plugin when no sound is on input or output to save the CPU power.
Parameter Right-Click Menu
Right-click any parameter to call up a menu that gives you access to:
The parameter description
Parameter reset
Double-click Menu
Some parameters let you access more accurate numeric settings by double-clicking the knobs.
Presets and left-right arrows
The plugin comes with a set of presets, which should do the trick for most cases or give you a good starting point when tweaking your sound. Access them using the right and left arrows, or by clicking the preset field directly. You can save and manage your own presets there as well. In your computer, presets are stored in the following paths:
Windows:
c:\Users\USER NAME\AppData\Roaming\UnitedPlugins\PRESETS\QuickVox
macOS X:
/Users/username/Library/Application Support/UnitedPlugins/PRESETS/QuickVox
(Right-Click the plugin background to open the preset folder directly)
Installation and maintenance
Use UnitedPluginsManager (Downloads section) to install, uninstall, update, and activate the plugin.
Support
If you find yourself in trouble, please contact us via support@unitedplugins.com.