QuickVoxCore Manual
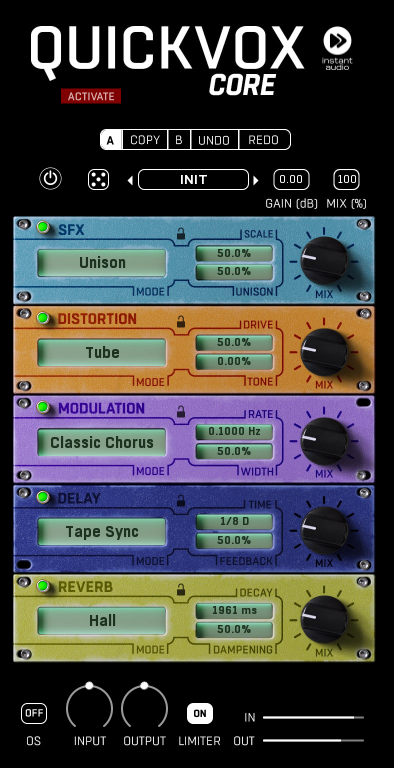
BYPASS - Turns the effect off.
Dice - Intelligent randomizer will generate random settings for the FX rack. It will change all parameters in all units of the affected rack.
Gain - Set the gain level for the wet signal by +/-12dB for the particular rack.
Mix - Set the ratio between dry and wet signal for the particular rack.
Effects
Each effect has a selector for effect mode and two parameters to edit.
Lock - Lock protects the effect's parameters from being overwritten when you load a preset or use a randomizer.
Bypass - Bypasses the actual module
Mix knob - sets the dry/wet ratio of a particular effect.
SFX
Type - selects the type of effect for the Special effects module. Choose from Unison, Pitch double, Freq shifter, Ring mod, Vocoder, LP filter, HP filter, Comb, Grain glitch, Double track, Autotune
Control A - changes the character of the effect. It will have a different function depending on the selected mode.
Control B - changes the character of the effect. It will have a different function depending on the selected mode.
Distortion
Type - selects the type of effect for the Distortion module. Choose from Tube, Tape, Fold, Crush, Derez, Amp, Clip, Pedal.
Drive - controls the amount of gain driving the distortion.
Tone - controls pre-distortion filtering. Left for low-pass and right for high-pass.
Modulation
Type - selects the type of effect for the Modulation module. Choose between Classic Chorus, Modern Chorus, Flanger, Flanger Sync, Phaser, Phaser Sync, Tremolo, Tremolo Sync, Vibrato, Vibrato Sync
Rate - controls the speed of the modulation.
Width - controls the left/right offset of the modulation.
Delay
Type - selects the type of effect for the Delay module. Choose between Digital, Digital Sync, Tape, Tape Sync, Ping Pong, Ping Pong Sync, Dual, Dual Sync, Wide, Wide Sync, Dark, Dark Sync, Light, Light Sync
Time - controls the delay length.
Feedback - controls the amount of signal fed back into the input, therefore, the number of delay repeats.
Reverb
Type - selects the type of effect for the Reverb module. Choose between Room, Studio, Lounge, Hall, Concert, Vintage, Chamber, Cathedral, Stadium, Plate, Spring, Shimmer
Decay - controls the length of the reverb tail.
Dampening - controls the amount of filtering over time.
Right-click
Right-click anywhere in the plugin background with the right mouse button, and you will get access to the following features.
Scale the GUI precisely by percentage.
Get the version info.
Change oversampling settings (switch to up to 8x oversampling)
Access the product web page, reach support, and access online documentation.
Contact support
Open preset folder (to add, arrange, or delete presets manually)
Activate/Deactivate the plugin
Access Licence manager (to activate or deactivate the plugin or several plugins at the same time)
Disable/Enable GPU Acceleration.
Right-click any control (knob, button) to access help for the particular parameter.
Service Menu
COPY - Takes the settings from the currently selected A or B slot and copies them into the other slot.
A & B - Switches between two states of the plugin. This can be used to make better decisions by directly comparing the before and after.
UNDO/REDO - Will revert back one step to help avoid the accidental change of parameter values
Presets
The plugin comes with a set of presets, which should do the trick for most cases or give you a good starting point when tweaking your sound. Access them by clicking the preset field directly. You can save and manage your own presets there as well. In your computer, presets are stored in the following paths:
Windows:
c:\Users\USER NAME\AppData\Roaming\UnitedPlugins\PRESETS\PLUGIN NAME
macOS X:
/Users/username/Library/Application Support/UnitedPlugins/PRESETS/PLUGIN NAME
Installation and maintenance
Installation is a quick and simple process involving downloading and using a standard installer on both platforms, Windows and Mac OS X. The installer places the plugins and presets into proper locations so that your DAW can easily find it. The plugin is available for all relevant interfaces: VST, VST3, AAX, and AU. Note that on OS X since High Sierra you may need to restart your computer to make your DAW find new plugins.
If you find yourself in trouble, please contact us via support@unitedplugins.com.
Updating
Updating the plugin to the newest version is as simple as using the newest installer.
Uninstallation
Windows
You can either use the link to the uninstaller in the start menu by typing Retronaut, for example or it can be accessed via Control Panels / Applications /
macOS X
First, delete the plugin files manually from:
AU: /Library/Audio/Plug-Ins/Components
VST: /Library/Audio/Plug-Ins/VST
VST3: /Library/Audio/Plug-Ins/VST3
AAX: /Library/Application Support/Avid/Audio/Plug-Ins
Then, if you really want to get rid of all data created by the plugin, remove the following folders as well:
HOME/Documents/JMGSound/RetronautCore
HOME/Library/Application support/JMGSound/RetronautCore
Note: Since OS X 10.7 (Lion), many folders are marked as hidden by default. To make them visible again in Finder, please follow this tutorial:
https://ianlunn.co.uk/articles/quickly-showhide-hidden-files-mac-os-x-mavericks/
Trial and activation
Retronaut is initially in demo mode, which lets you evaluate the plugin. Try it in your mixing/mastering sessions and make sure it really does the trick. When ready, purchase a licence from our shop or any of our resellers. You will receive a so-called licence file, which you download to your computer. The plugin displays an ACTIVATE button when in trial mode. Click it and select the licence file. The plugin will check the licence and activate the licence on your computer. After you restart your DAW, the plugin will be activated and will work indefinitely without restrictions. You can use the plugin on all your computers.
Support
Now that you’ve taken the time to learn all about Retronaut, enjoy and make your sound awesome! If our plug-ins helped you take your production to the next level, let us know. We’d love to hear from you and what you were able to create with our software.
If you encounter any problems, we offer free technical support for all registered users. Start with the frequently asked questions here:
http://www.unitedplugins.com/faq
If you need further assistance, you can find our Customer Support contact form at:
http://www.unitedplugins.com/contact
You can also reach our support staff by e-mail at:
support@unitedplugins.com