Relooper Manual
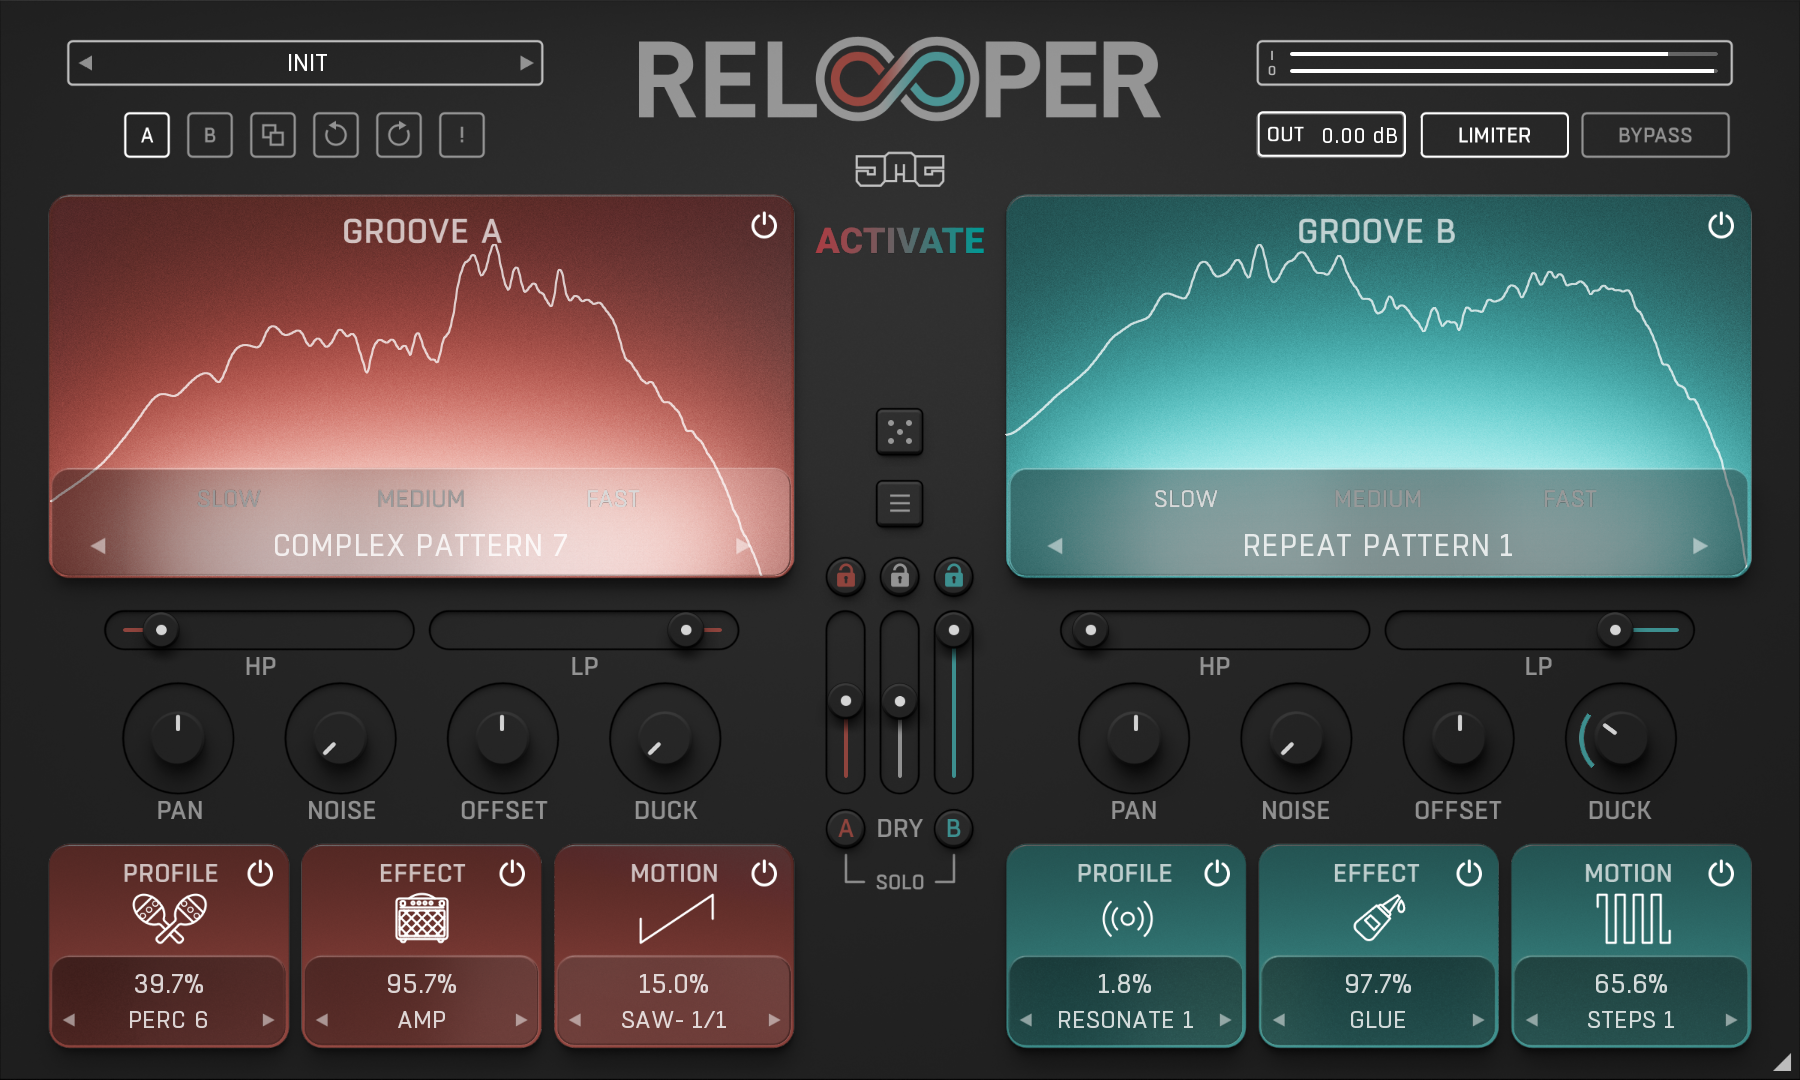
GROOVE
TYPE - Selects the type of groove from 8 categories:
TIME = Different playback speeds, where HALF results in 1 octave below and DOUBLE 1 octave above.
REPEAT = Takes sections of the loop and repeats them.
REVERSE = Records a section into the buffer, then plays it backwards at various speeds.
REMIX = Slices the loop into sections and plays them back in a different order.
SYNCOPATE = Slices the loop into sections and moves them offbeat to create syncopations.
STUTTER = Quickly repeats sections for the entire loop.
COMPLEX = Uses combinations of all the other types.
GLITCH = Experimental types.
BUFFER - Selects from SLOW, MEDIUM, and FAST buffer sizes.
HP - Controls the frequency of the high-pass filter.
LP - Controls the frequency of the low-pass filter.
PAN - Controls the left-to-right position.
NOISE - Mixes in level-followed noise. This can often be useful in combination with PROFILE.
OFFSET - Delays the playback in synced 1/16 increments. Negative values cause negative delay; this is possible by introducing plugin latency.
DUCK - Controls the amount of sidechain ducking from the dry signal.
PROFILE
TYPE - Selects the type of profile from 8 categories:
KICK, SNARE, CYMBAL, and PERC all morph into various drum characteristics.
FOLEY morphs into found sounds, such as water.
SYNTH resynthesizes your audio, where A follows the pitch of the groove and B, the plugin's input.
RESONATE morphs into a complex resonant filter.
SPACE morphs into various "3D" spaces, making the sound get wider and deeper.
DEPTH - Controls the amount of profile morphing.
EFFECT
TYPE - Selects from various effect types.
DEPTH - Controls the amount of the effect.
MOTION
TYPE - Selects from various shapes of level modulation.
FILL = Silences the groove (when depth is at 100%) until the end of N bars. S = short and L = long. The following ratio shows how often the fill will play, for example, 2/1 play once every two bars.
STEPS = Works like a trance-gate with various patterns.
SINE, TRI, SQR, and SAW are LFO shapes that run at various synced rates, where "-" inverts the polarity.
PUMP = Works like a sidechain pumping effect, especially when set to 1/4. While PULSE is the inverse.
DEPTH - Controls the amount that the level is modulated.
Toolbar
Relooper features several standard controls, which can improve your workflow.
A, B, and Copy buttons - The plugin remembers two sets of settings, A and B. Clicking any of these two buttons switches between these two settings. The selected one is highlighted in red. This is a great way for A/B checking and selecting the best settings. The "Copy" button copies the current settings to the other slot (if A is currently selected, the button will copy the current settings to slot B).
Presets and right and left arrows - The plugin comes with a set of presets, which should do the trick for most cases. Access them using the right and left arrows or by clicking the preset field directly. There, you can save and manage your own presets as well.
Undo and Redo buttons - All of us make a mistake from time to time, which is when these two buttons come in handy. Undo button reverts your last change, Redo puts it back.
Bypass button - It is always a good idea to check if the plugin actually improves your sound, which is what the bypass button is for. In many DAWs it will be in sync with the DAW's bypass button (if it has one).
Presets and left-right arrows
The plugin comes with a set of presets, which should do the trick for most cases or give you a good starting point when tweaking your sound. Access them using the right and left arrows, or by clicking the preset field directly. You can save and manage your own presets there as well. In your computer, presets are stored in the following paths:
Windows:
c:\Users\USER NAME\AppData\Roaming\UnitedPlugins\PRESETS\PLUGIN NAME
macOS X:
/Users/username/Library/Application Support/UnitedPlugins/PRESETS/PLUGIN NAME
Right-Click menu
Right-click anywhere in the plugin background with the right mouse button, and you will get access to the following features.
Silence on stop
Scale GUI precisely by percentage.
Get the version info.
Access the product web page, reach support, and access online documentation.
Contact support
Open the presets folder (to add, arrange, or delete presets manually)
Activate/Deactivate the plugin
Access Licence Manager (to activate or deactivate the plugin or several plugins at the same time)
Disable/Enable GPU Acceleration.
Disable/Enable Intelligent sleep on silence function that disables the plugin when no sound is on input or output to save CPU power.
Right-click any control (knob, button) to access help for the particular parameter.
Double-click Menu
Some parameters let you access more accurate numeric settings by double-clicking the knobs.
Installation and maintenance
Use UnitedPluginsManager (Downloads section) to install, uninstall, update, and activate the plugin.
If you find yourself in trouble, please contact us via support@unitedplugins.com.
Common functions
(Available in most plugins)
Activate button - Opens a browser to locate the licence file to unlock the full version. (This can easily be handled by UnitedPlugins Manager right after installation)
Toolbar
Relooper features several standard controls, which can improve your workflow.
A, B and Copy buttons - The plugin remembers two sets of settings, A and B. Clicking any of these two buttons switches between these two settings. The selected one is highlighted in red. This is a great way for A/B checking and selecting the best settings. The "Copy" button copies the current settings to the other slot (if A is currently selected, the button will copy the current settings to slot B).
Presets and right and left arrows - The plugin comes with a set of presets, which should do the trick for most cases. Access them using the right and left arrows or by clicking the preset field directly. There, you can save and manage your own presets as well.
Undo/Redo - Will revert back one step to help avoid the accidental change of parameter values.
Background Right-Click Menu
Right-click anywhere in the plugin background with the right mouse button, and you will get access to the following features.
Scale the GUI precisely by percentage.
Get the version info.
Access the product web page, reach support and the online documentation.
Contact support
Open the presets folder (to add, arrange or delete presets manually)
Activate/Deactivate the plugin
Access Licence Manager (to activate or deactivate the plugin or several plugins at the same time)
Disable/Enable GPU Acceleration.
Disable/Enable Intelligent sleep on silence function that disables the plugin when no sound is on input or output to save the CPU power.
Parameter Right-Click Menu
Right-click any parameter to call up a menu that gives you access to:
The parameter description
Parameter reset
Double-click Menu
Some parameters let you access more accurate numeric settings by double-clicking the knobs.
Presets and left-right arrows
The plugin comes with a set of presets, which should do the trick for most cases or give you a good starting point when tweaking your sound. Access them using the right and left arrows, or by clicking the preset field directly. You can save and manage your own presets there as well. In your computer, presets are stored in the following paths:
Windows:
c:\Users\USER NAME\AppData\Roaming\UnitedPlugins\PRESETS\Relooper
macOS X:
/Users/username/Library/Application Support/UnitedPlugins/PRESETS/Relooper
(Right-Click the plugin background to open the preset folder directly)
Installation and maintenance
Use UnitedPluginsManager (Downloads section) to install, uninstall, update, and activate the plugin.
Support
If you find yourself in trouble, please contact us via support@unitedplugins.com.