Bassment Manual
Global
Analyse input level - Bassment features an automatic input level setup, which makes sure everything sounds as good as possible no matter what equipment and guitar you are using. Push the button and play as hard as you can for a few seconds. Bassment will adapt to your style and dynamics and will find a perfect working point for all the included components. Then push the button again to make sure the level stays consistent.
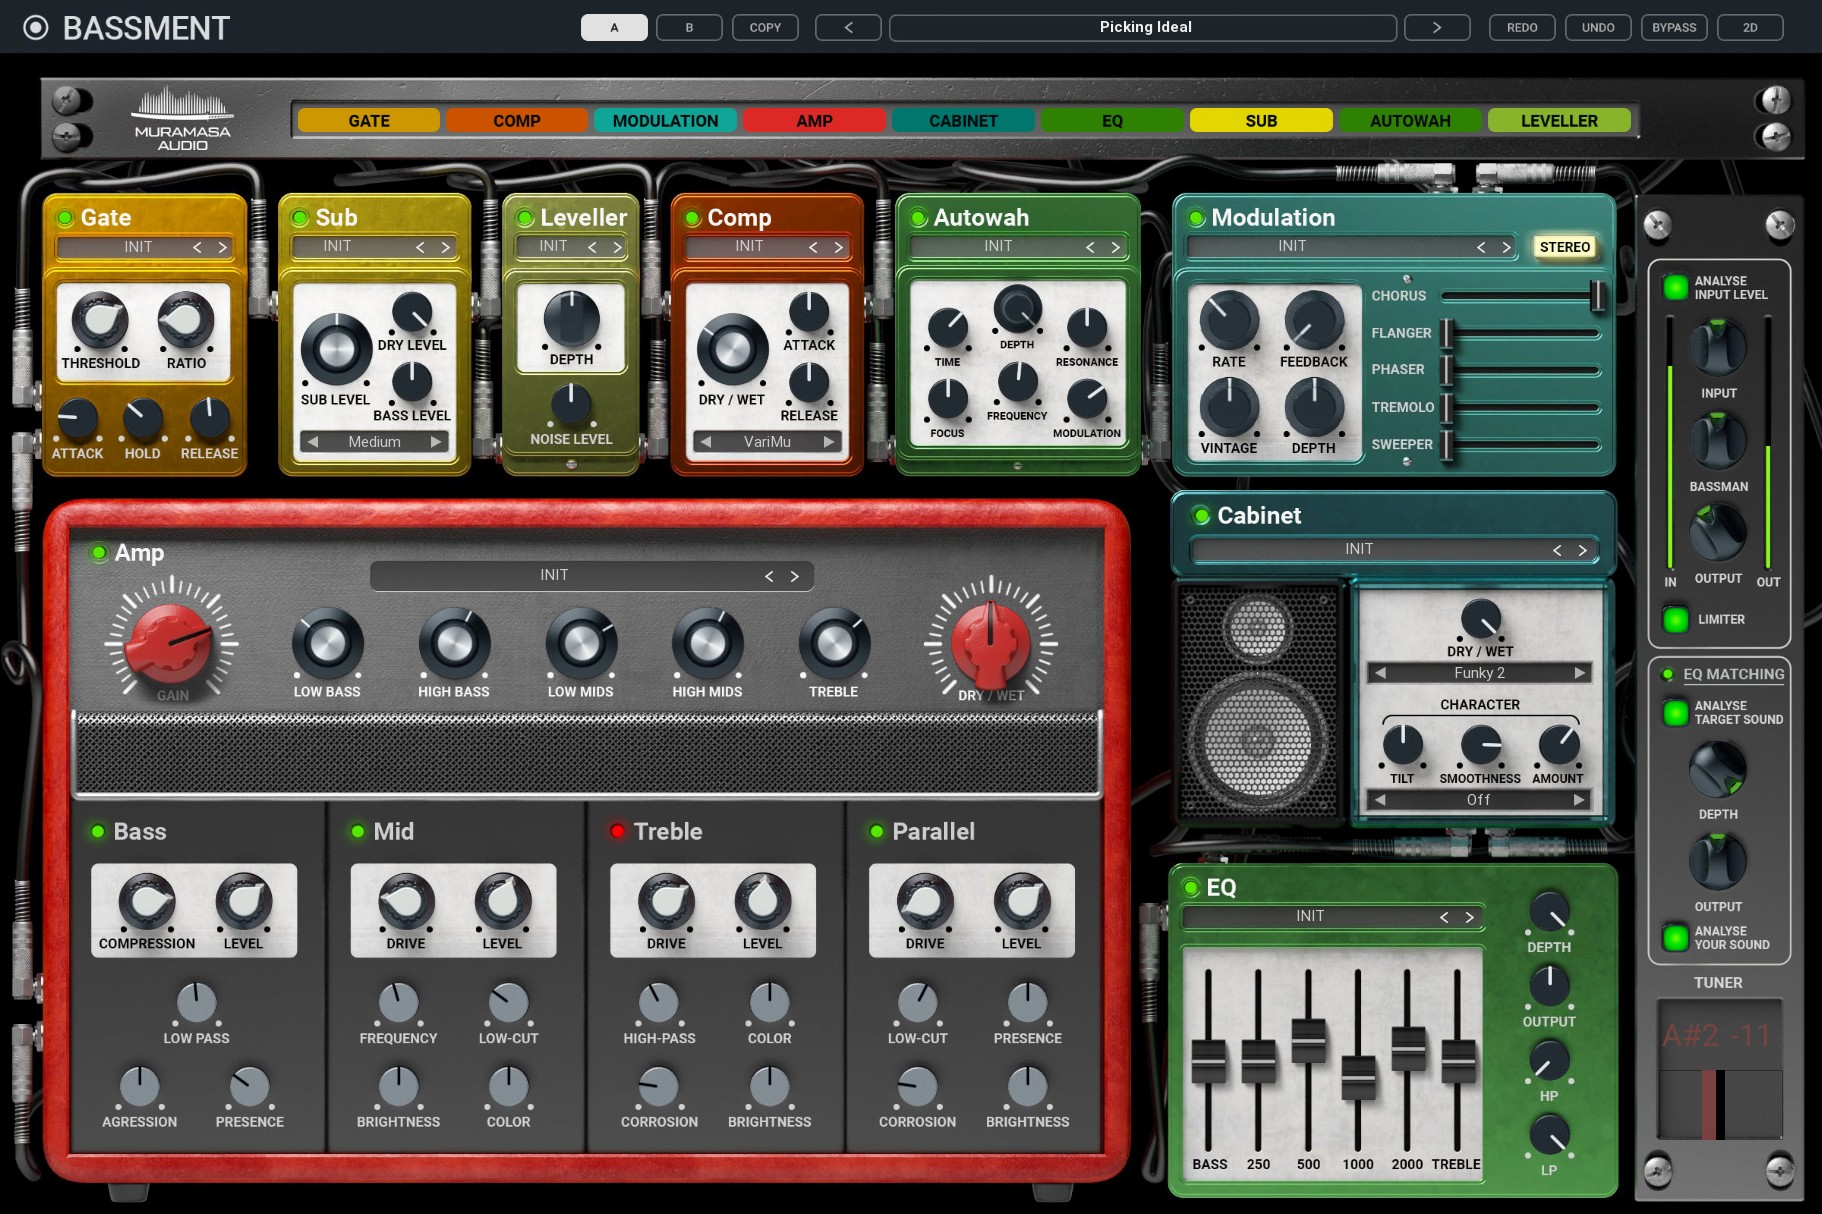
Input - Use to crank the input gain for your instrument. Shouldn't be needed if you use the Analyse input level feature.
Bassman - Controls the level of the "sub" generated by the plugin. It lets you play "something like a bass" using your guitar. Works well only for single notes, not chords.
Output - Control the plugin's overall output level.
Limiter - Protects the output signal from going over 0 dB.
EQ Matching
The EQ Matching component automatically transfers sonic features of the guitar sound you like to your own sound. To use it, first get a short piece of the solo guitar sound you like. Other instruments must not be playing, no drums, no bass, no vocals, just the guitar. Loop it and click Analyse target sound button and let it play for about 7 seconds. Then press the button again to stop the analysis. Next, record your own guitar, playing the same or similar riff. Loop it and do the same analysis using the Analyse your sound button. When you stop the analysis, the plugin starts matching the sonic properties.
Enable - Enables the EQ Matching component.
Depth - Controls how close your sound gets to the target guitar sound. Note that the sound will never be identical, unless you'd use the same guitar, amp settings and, well, hands.
Output - Use to compensate for volume changes caused by the EQ Matching section.
Order

Drag and drop the components to put them in the desired position in the effect chain. Do not hesitate to experiment and put the components where they wouldn't belong in the real world. Double-clicking the components' rectangles bypasses/activates the components.
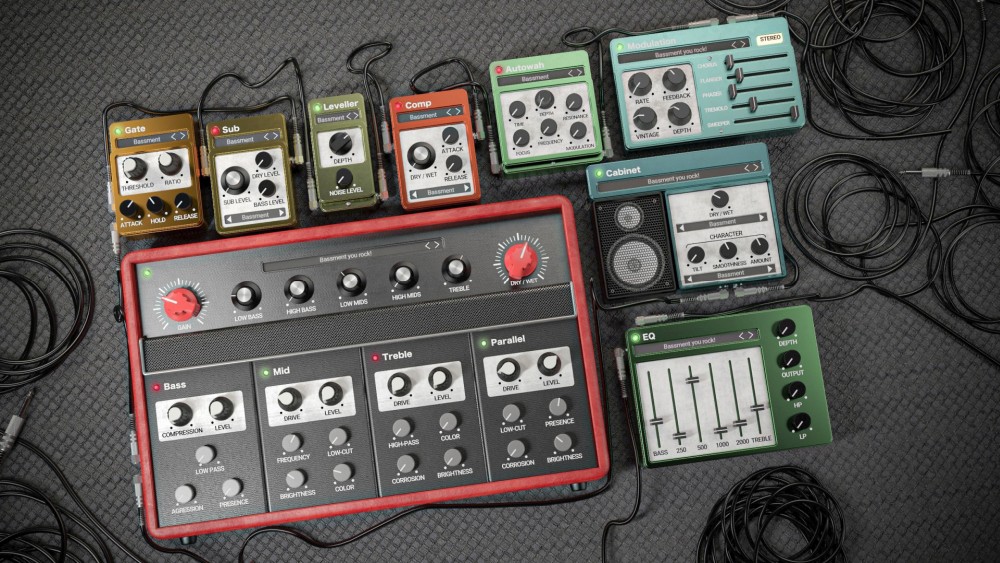
Gate
Gate, commonly known as Noise gate lets you remove passages, where you are not playing the guitar at all, however, noise, hum and leakage from other instruments may still be present in the input signal and would become highly amplified by all the amping and distortion stages in Bassment. It also lets you be even more aggressive and produce a certain choppy sound especially useful for modern metal genres, where everything needs to be very precise and quick attacks are appreciated. Gate is usually the first item in the processing chain.
Threshold - Determines the level of noise under which the incoming signal is considered noise.
Ratio - Defines the ratio of level reduction. Once a signal falls below the threshold, its gain is reduced to 1/20th of what it was before - if the ratio is 1:20. Bassment's gate operates between 1:1 and 1:20.
Attack - Determines how fast the gate will open when the incoming signal level is greater than a Threshold level.
Hold - Defines how long the gate will stay open after the signal drops again below the Threshold level.
Release - Controls how fast the gate will close after the Hold time expires.
Sub
Bypass - Controls the "Sub" component on/off. Sub adds subharmonic frequencies
Sub Level - Controls the level of synthesized subharmonic bass signal added to the output.
Dry Level - Controls the level of dry signal
Bass Level - Controls the level of synthesized bass signal added to the output.
Leveller
Leveller controls the volume changes of the signal by automatically riding the volume
Depth - Controls the depth of levelling processor. It means the amount how much it works.
Noise Level - Controls the level where the Leveller would work to not put up the amp and another noise
Compressor
A compressor reduces the volume of loud sounds or amplifies quiet sounds. Thus reducing or compressing an audio signal's dynamic range. Placing it before the amp will stabilize the distortion character. Placing it after will stabilize the output level.
Enable - Turns the Compressor component on/off
Mode - Bassment's compressor lets you choose from your favourite types of high-end studio compressors (76, VariMu and Stressor), combinations of two of them (VariStress, Vari76, Stress76) or All of them.
Dry/Wet - Mixes dry and compressed signals. In other words, controls how much you want your signal to be compressed.
Attack - controls how quickly the compressor increases gain reduction. In practice the lower the attack time, the more the transients get removed.
Release - Controls how quickly the compressor lowers the gain reduction. Lower release time usually produces a more pumped sound.
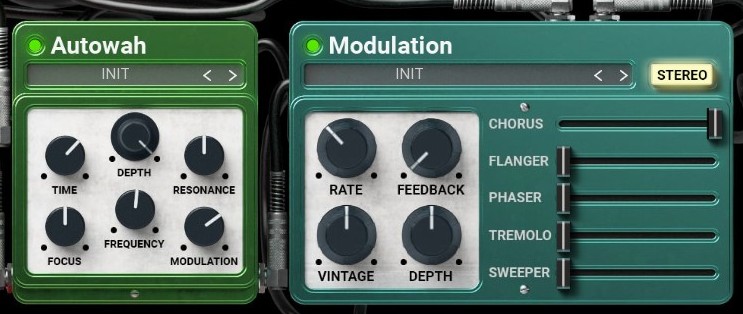
Autowah
Autowah implements an automatic wah-wah filter following the input level and is commonly used in styles such as funky.
Enable - Turns on/off the Autowah effect.
Depth - Controls the ratio between the dry input and the output from the autowah.
Time - Controls the wah frequency. Double-click the knob to enter an exact value or sync with the project tempo.
Resonance - Defines the resonance of the autowah filters.
Focus - Controls the dynamic range. Increase it to make it more aggressive and respond even to small level changes in the input signal. Lower it to make it more dynamic.
Frequency - Determines the modulation effect frequency for Autowah
Modulation - Determines the level of modulation for Autowah
Modulation
Rather than having several stompboxes Bassment's modulation section lets you blend multiple effects. This has many advantages. One of which is a perfect sync of the algorithms and it is way easier to operate. The effects are executed serially in the order you see in the GUI (cannot be changed).
Enable - Turns the modulation effect section on.
Stereo - Enabling this button will widen the stereo image of the effect.
Rate - Determines the modulation effect frequency.
Feedback - Most modulation effects are based on some sort of delays, which often naturally provide feedback lines, which send the processed signal back to the input. Its effect depends on the modulation effect being enabled. The most common is using the feedback on the flanger to get the classic squeaky sound.
Vintage - Adds pleasant vintage analogue saturation to the modulation.
Depth - Controls the depth of each modulation processor. What it does depends on the effect itself. For example, in chorus this controls the delay length, hence the higher it is, the more "chorusy" it sounds like. In tremolo, however, this controls the low-frequency oscillator shape. The rule of thumb is to listen and use whatever sounds good to you.
Chorus - Controls the dry/wet ratio for the chorus.
Flanger - Controls the dry/wet ratio for the flanger.
Phaser - Controls the dry/wet ratio for the phaser.
Tremolo - Controls the dry/wet ratio for the tremolo.
Sweeper - Controls the dry/wet ratio for the sweeper.
Amp
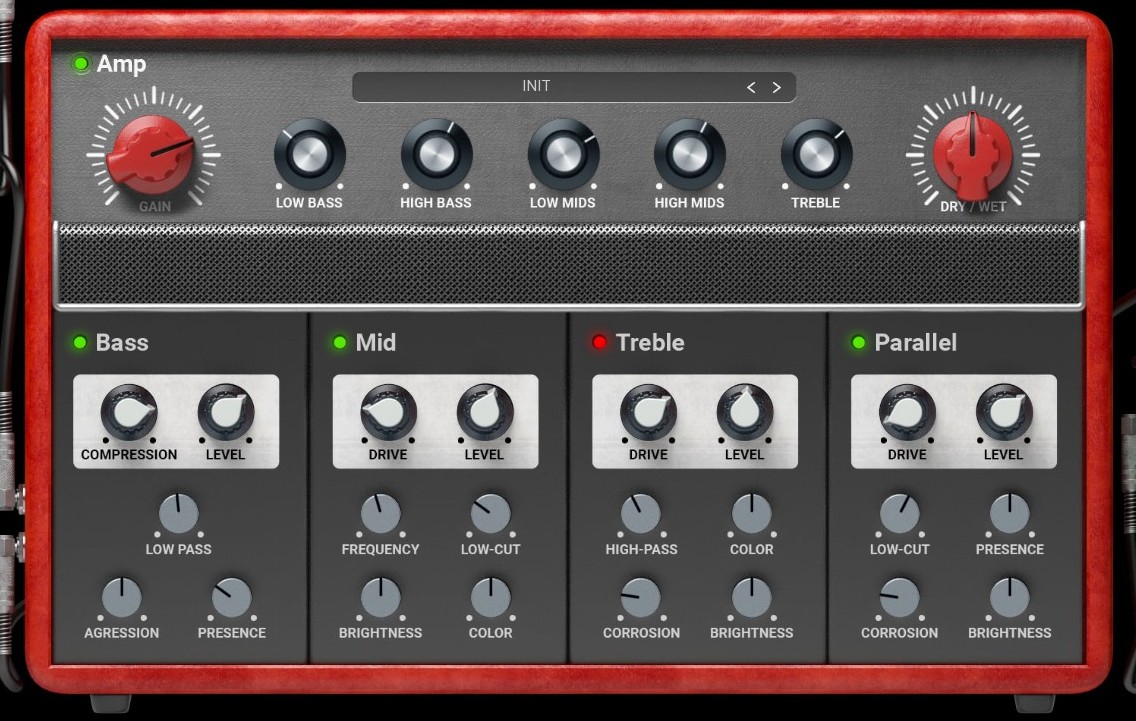
Gain - Controls
the input gain of the simulated amp. The higher the value is the
more distorted sound you get.
Low Bass - Controls the amount of the lowest frequencies of the amp's EQ
High Bass - Controls the amount of the higher low frequencies of the amp's EQ
Low Mids - Controls the amount of the lower middle frequencies of the amp's EQ
High Mids - Controls the amount of the lower middle frequencies of the amp's EQ
Treble - Controls the amount of high frequencies of the amp's EQ
Dry/Wet - Controls the mix of dry and amped signals. In other words, controls how much you want your signal to be amped.
Bass
Controls the way you work separately with bass freq of the signal
Compression -
Level - Controls the volume of the Bass component
Low Pass - Controls the Low-Pass filter frequency for the Bass component between 60 and 260 Hz
Aggression - Controls the special Aggression process of the Bass component
Presence - Controls the Presence level of the Bass component -/+6dB
Mids
Controls the way you can work separately with mid freq of the signal
Drive - Controls the Drive level for the Mid component, It is actually the level of saturation gain.
Level - Controls the volume of Mid component
Frequency - Controls the value of the frequency between 100 and 500Hz for the Mid component
Low Cut - Controls the Hi-Pass filter frequency for Mid component between 100 and 1000 Hz
Brightness - Controls the Brightness for the Mid component -/+10dB
Color - Controls the Color level for the Mid component
Treble
Controls the way you can work separately with treble freq of the signal
Drive - Controls the Drive level for the Treble component, It is actually the level of saturation gain
Level - Controls the volume of the Treble component
High Pass - Controls the Hi-Pass filter frequency for Treble component between 200 and 12 000Hz
Color - Controls the Color level for the Treble component
Corrosion - Applies rust and dirt and the analogue feel to the amp section.
Brightness - Controls the Brightness for the treble component -/+ 10dB
Parallel
Parallel is actually a parallel saturation/distortion component
Drive - Controls the Drive level for the Parallel component, It is actually the level of parallel saturation gain.
Level - Controls the volume of the Parallel component
Low-Cut - Controls the Hi-Pass filter frequency for the Parallel component between 100 and 300Hz
Presence - Controls the presence ( higher freq) for the Parallel component
Corrosion - Applies rust and dirt and the analogue feel to the amp section.
Brightness - Controls the brightness (the highest freq) for the Parallel component -/+ 16 dB
Cabinet
The Cabinet section of Bassment is unlike anything else. It doesn't let you load your IRs etc., instead, it produces a true virtual amp simulator with several parameters, which let you easily set up the amp instead of a neverending search through thousands of IR files you may be unfortunate to be used to. Our cabinet simulator also produces a much smoother and more natural sound, which avoids the unnatural resonances present with almost all classic IRs.
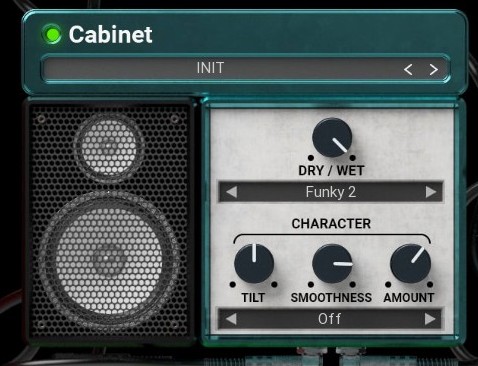
Speaker - Speaker lets you select from 16 predefined speaker sounds based on some classic speaker measurements. It provides the basis of the cabinet sound.
Character - Character lets you further customize the cabinet sound. Together with Speaker, you get over 300 virtual cabinets.
Output - Controls the output gain.
Tilt - Tilt lets you make the cabinet darker (below 0) or brighter (above 0) using a very natural tilt filter.
Detail - Detail lets you add resonances to your cabinet. The character of these resonances depends on the Character parameter.
Stereo - The stereo switch makes the cabinet produce a stereo width. Sort of like using a good combination of cabinet IRs, but here every combination will sound "good".
Ambience Bank - Ambience bank selects an ambience response you can add to your cabinet. This simulates the reflections from the surroundings of the real cabinet.
Depth - Depth controls the amount of ambience mixed in.
EQ
EQ provides a powerful graphics equalizer useful to further customize the tonal response. Placing it before the amp will also affect the character of the distortion. Placing it after the amp will only change the tone.
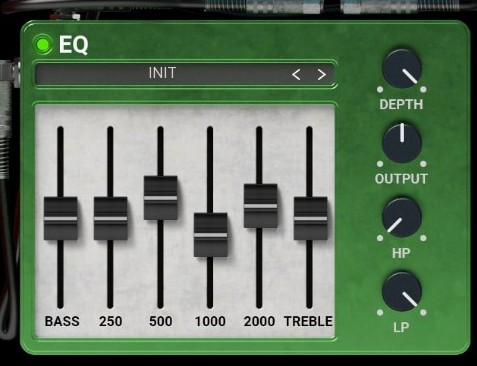
Depth - Depth controls the amount of effect caused by the EQ. It is quite a rare parameter, but it lets you set the EQ up easily by first using the bands strongly, exaggerating the parts of the tone you want to amplify and vice versa, and then using the Depth to lower the effect of the EQ to make it sound natural.
Output - Controls the output gain.
HP - Set the Hi-Pass filter frequency between 20 and 800Hz. In most cases, it is good to remove the low end of electric guitars to avoid muddying the mix and leaving space for bass and kick.
LP - Set the Low-Pass filter frequency between 1 and 20kHz. It can be used to remove the harshness produced by high gain distortion and leave space in the mix for other elements, such as a hi-hat.
Bass - Adjusts the band of frequencies around 100Hz in the range of +/-12dB
250 - Adjusts the band of frequencies around 250Hz in the range of +/-12dB
500 - Adjusts the band of frequencies around 500Hz in the range of +/-12dB
1000 - Adjusts the band of frequencies around 1000Hz in the range of +/-12dB
2000 - Adjusts the band of frequencies around 2000Hz in the range of +/-12dB
Treble - Adjusts the band of frequencies around 4,2 kHz in the range of +/-24dB
Bassment Top Toolbar
Bassment features several standard controls, which can improve your workflow.

A, B and Copy buttons - The plugin remembers two sets of settings, A and B. Clicking any of these two buttons switches between these two settings. The selected one is highlighted in red. This is an excellent way for A/B checking and selecting the best settings. The "Copy" button copies the current settings to the other slot (if A is currently selected, the button will copy the current settings to slot B).
Presets and right and left arrows
The plugin comes with a set of presets, which should do the trick for most cases. Access them using the right and left arrows or by clicking the preset field directly. There, you can save and manage your own presets as well.
Windows:
C:\Users\username\Documents\Muramasa\Bassment
Mac OS X:
HOME/Documents/Muramasa/Bassment
Undo and Redo buttons
All of us make a mistake from time to time, which is when these two buttons come in handy. The undo button reverts your last change, and Redo puts it back. Right-click anywhere in the plugin background. The item "Open presets folder" will navigate you to a directory in which the plugin stores its presets:
C:/Users/username/AppData/Roaming/UnitedPlugins/PRESETS/PluginID
MAC: ~/Library/Application Support/UnitedPlugins/PRESETS/PluginID
(Formerly
Bypass button - It is always a good idea to check if the plugin improves your sound, which is what the bypass button is for. In many DAWs, it will be in sync with the DAW's bypass button (if it has one).
3D/2D button - hitting this button allows you to choose between 2D and 3D graphical user interfaces. It has absolutely NO effect on SOUND or on CPU usage.
Right-Click
Right-click anywhere in the plugin background with the right mouse button, and you will get access to the following features.
Change oversampling settings (Plugins that support oversampling only)
Scale GUI precisely by per cent.
Get the version info.
Access product web page, reach support and access online documentation.
Contact support
Open the presets folder (to add, arrange or delete presets manually)
Activate/Deactivate the plugin
Access Licence Manager (to activate or deactivate the plugin or several plugins at the same time)
Disable/Enable GPU Acceleration.
Disable/Enable Intelligent sleep on silence function that disables the plugin when no sound is on input or output to save the CPU power.
Right-click any control (knob, button) to access help for the particular parameter.
Double-click Menu
Some parameters let you access more accurate numeric settings by double-clicking the knobs.
Installation and maintenance
Use UnitedPluginsManager to install, uninstall, and update all UnitedPlugins effects.
Trial and activation
Our plugins are initially in demo mode, which lets you evaluate the plugin. Try it in your mixing/mastering sessions, and make sure it does the trick. When ready, purchase a licence from our shop or any of our resellers. After you purchase a license, you may activate it using UnitedPluginsManager. Find the complete activation tutorial on the download page.
Support
Now that you’ve taken the time to learn all about Bassment, enjoy and make your sound awesome! If our plug-ins helped you take your production to the next level, let us know, we’d love to hear from you and what you were able to create with our software.
If you encounter any problems, we offer free technical support for all registered users. Start with the frequently asked questions here:
http://www.unitedplugins.com/faq
If you need further assistance, you can find our Customer Support contact form at:
http://www.unitedplugins.com/contact
You can also reach our support staff by e-mail at:
support@unitedplugins.com
Common functions
(Available in most plugins)
Activate button - Opens a browser to locate the licence file to unlock the full version. (This can easily be handled by UnitedPlugins Manager right after installation)
Toolbar
Bassment features several standard controls, which can improve your workflow.
A, B and Copy buttons - The plugin remembers two sets of settings, A and B. Clicking any of these two buttons switches between these two settings. The selected one is highlighted in red. This is a great way for A/B checking and selecting the best settings. The "Copy" button copies the current settings to the other slot (if A is currently selected, the button will copy the current settings to slot B).
Presets and right and left arrows - The plugin comes with a set of presets, which should do the trick for most cases. Access them using the right and left arrows or by clicking the preset field directly. There, you can save and manage your own presets as well.
Undo/Redo - Will revert back one step to help avoid the accidental change of parameter values.
Background Right-Click Menu
Right-click anywhere in the plugin background with the right mouse button, and you will get access to the following features.
Scale the GUI precisely by percentage.
Get the version info.
Access the product web page, reach support and the online documentation.
Contact support
Open the presets folder (to add, arrange or delete presets manually)
Activate/Deactivate the plugin
Access Licence Manager (to activate or deactivate the plugin or several plugins at the same time)
Disable/Enable GPU Acceleration.
Disable/Enable Intelligent sleep on silence function that disables the plugin when no sound is on input or output to save the CPU power.
Parameter Right-Click Menu
Right-click any parameter to call up a menu that gives you access to:
The parameter description
Parameter reset
Double-click Menu
Some parameters let you access more accurate numeric settings by double-clicking the knobs.
Presets and left-right arrows
The plugin comes with a set of presets, which should do the trick for most cases or give you a good starting point when tweaking your sound. Access them using the right and left arrows, or by clicking the preset field directly. You can save and manage your own presets there as well. In your computer, presets are stored in the following paths:
Windows:
c:\Users\USER NAME\AppData\Roaming\UnitedPlugins\PRESETS\Bassment
macOS X:
/Users/username/Library/Application Support/UnitedPlugins/PRESETS/Bassment
(Right-Click the plugin background to open the preset folder directly)
Installation and maintenance
Use UnitedPluginsManager (Downloads section) to install, uninstall, update, and activate the plugin.
Support
If you find yourself in trouble, please contact us via support@unitedplugins.com.